done with the move!

Well, mostly.  A couple of boxes are left to unpack, but all in all I’m very satisfied with our new house.  Zero loves it too!  Here she is sitting on the daybed with my CAL blanket:

zero2
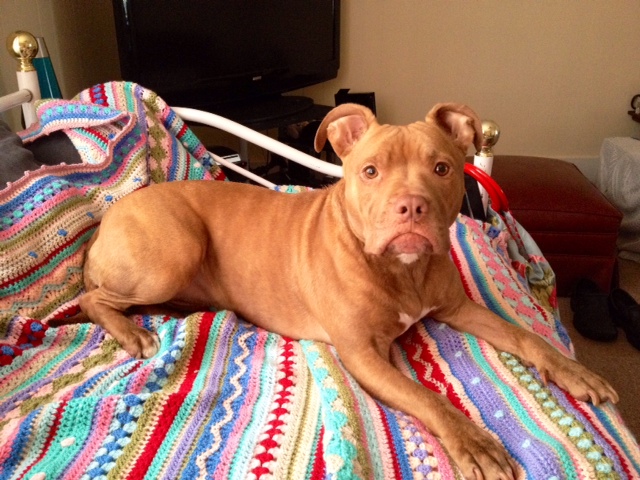
That’s her “what are you doing?” face.

zero1She loves the yard so much!  I’m so glad she’s finally happy.  We threw away a LOT of stuff so it’s nice and uncluttered and very roomy inside, as well!

Today is the first day I could post because today is our first day having Internet.  I know I’m spoiled because it was very difficult going without it!  I know I must have used a ton of data on my phone…

I was busy knitting and crocheting, too!  I started crocheting a shawl:

frogged(Yep, no sheets on the daybed at the point that was taken, and yep, I love to sit cross-legged/Indian style.)  As you can see I’m unraveling it to knit a scarf — the pattern was so hard for me to follow!  It’s cheche a la sauce and it was originally in French, so perhaps that was part of the problem.  The beginnings and ends of the rows don’t match up!  I must have been missing something but I could not figure it out, and after hours of re-working and re-working it, trying to get the edges correct, I gave up.  I think I’m giving up on that scarf, too, in favor of something that will take up all 3 balls of yarn I got for that project.

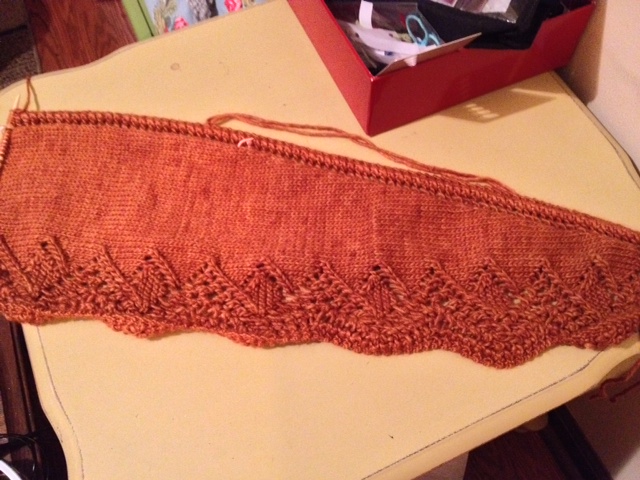
My knitting has much more to show for the effort.  I finished the Bajada scarf for my friend.  It took approximately 18 hours total of very focused knitting to complete, and because of that I don’t think I’ll be making another one (after all, I can whip up a crocheted scarf in an hour and a half).  I also had to write out the pattern row by row to keep track of everything and squinting at the small print in the booklet got old real quick.  It was worth it though:

bajada3
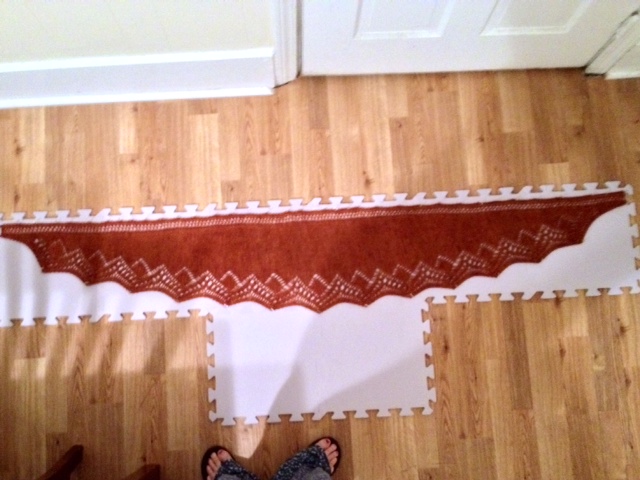
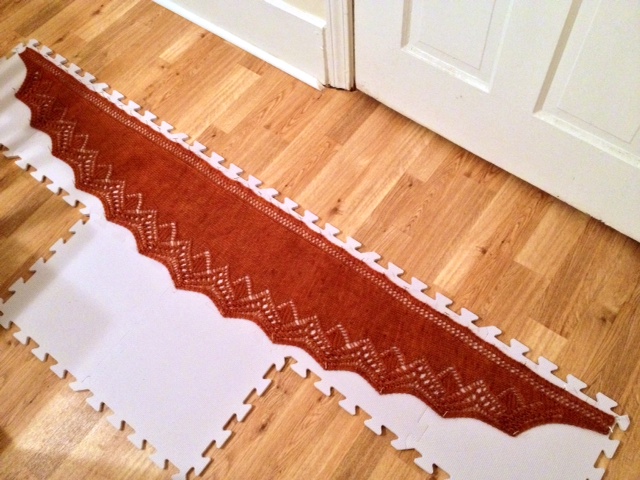
It totals at 69 inches (175cm) long and 11.5 inches (29cm) tall at its widest point.

bajada4

bajada6
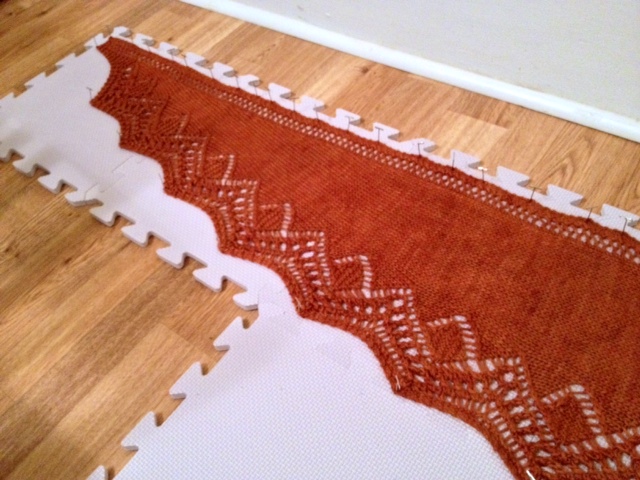
As you can see, I need to purchase some blocking wires.  They’re just so expensive for little wires (at least on KnitPicks, where I got everything else for relatively cheap), and I keep meaning to just go to a hardware store and get some wires cut for me.  It just hasn’t happened yet.

bajada5I can’t wait for it to dry so that I can mail it to my friend!  I’ll be back up there in a couple of weeks for the yearly Renaissance Fair but I don’t want her to have to wait that long.  I hope she likes it!

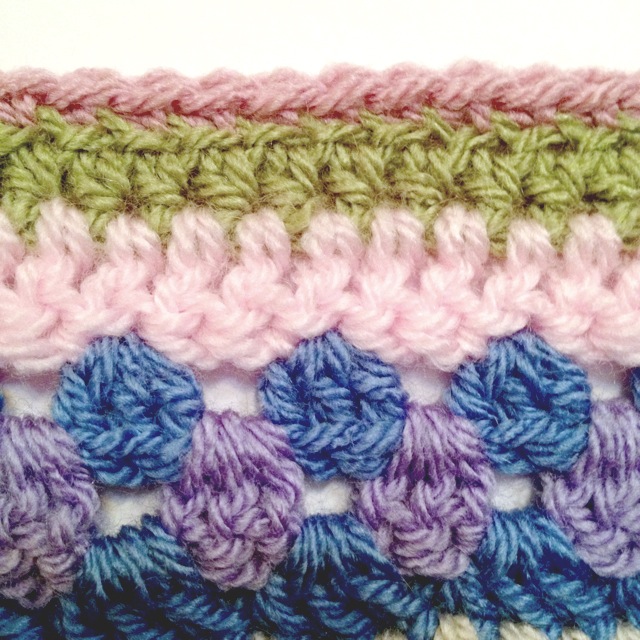
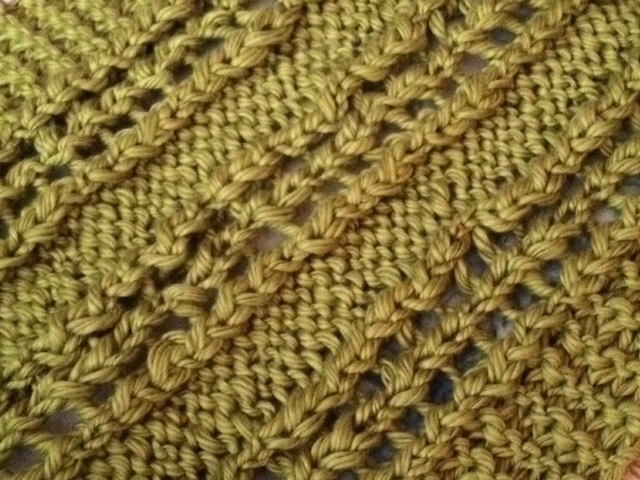
The Northern Loop cowl has been my other knitting project.  I’ve been using KnitPicks’ Billow bulky yarn and it is so wonderful to work with!  So very soft, and what gorgeous colors they have available!  I’ll definitely be repurchasing this.  This could be dangerous…  Here’s a bit of my cowl:

northernloop2
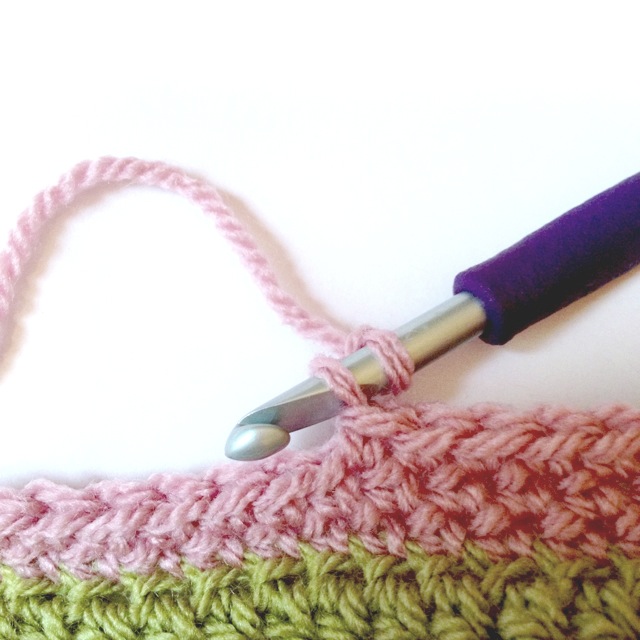
I’m loving it!  The only thing that was kinda iffy about the pattern was the provisional cast on, but I looked up a tutorial on YouTube and did it easily with a length of crochet chain:

northernloop1Not as bad as I thought it would be!  Grafting it together at the end might be difficult, but I’ll just look up another tutorial for that later.

Well, that’s all the catch-up I have that I can think of right now.  I’m still editing the site so if you see anything that looks crazy (like the site title overlapping with the menu bar or something), please let me know.  I’m unsure how it will look on tablets or really large screens, but I’m trying to learn to use rem spacing instead of pixels in my CSS coding, so hopefully it won’t be too bad.

Let me know what ya’ll have been up to while I’ve been away!  I’m trying to catch up with everyone’s news!  Thanks for stopping by!

yep, it worked; chunky circle scarf #2

In my last post I talked of how I was stressed, and how I was going to pull out a new crochet project.  Well I did, and it’s done.  It de-stressed me so much I couldn’t put it down.  Let me introduce to you the Chunky Circle Scarf 2:

chunky cowl 2 1It is a lovely, plush cowl (worked flat and seamed) from a free pattern (click here), and it took me about 2 1/4 skeins of KnitPicks Brava Bulky in the shade Tranquil.  I’ve actually already made one, but it was in January of 2012 so it was time for another!

The Tranquil shade appears very vibrant in these photos but you can see that the stitch pattern is very, very close to the Catharine wheel pattern from our recent crochet along:

chunky cowl 2 2So basically if you liked that stitch you can make this easily within a few short hours, and it’s definitely worth the multitudes of yarn it requires — it’s SO plush and kooshy — and the KnitPicks Brava Bulky is incredibly soft for an acrylic yarn.  I’d highly recommend it as it is also very decently priced!  By the way, the cowl is folded in half in the picture above so you see only 1/4 of it’s total size.

Most unfortunately I was planning to sell this cowl, but in the pattern the designer states that she’d prefer that the pattern is used for personal use only.  Well, it’ll make someone a great Christmas present!

chunky cowl 2 3I guess that’s all for today!  I’d better get to bed because tomorrow my parents are coming to help me give my new rented house a thorough cleaning before we start bringing in furniture, and I’ll need my energy!  Thanks for stopping by!


back to the yarn!

It’s been weird post CAL not having to work to a deadline.  Also weird because I haven’t been crafting much.  The only think I’m working on actively is the bajada shawl/scarf for my friend — she bought the yarn so I want to get it to her ASAP so she can enjoy it.  It’s slow going though; after 3 weeks here’s what I’ve got:

bajada2It will certainly need some blocking before I give it to her, but that’s OK.

As far as crochet goes, I’ve been meaning to get going on a new ripple afghan — baby sized — out of my leftover CAL yarn:

photo 1Yep, I only used half of what I ordered in the CAL.  That’s the great thing about Stylecraft Special DK — I’m always pleasantly surprised that I have so much of it leftover!  Well, as great as it is, I still haven’t started the blanket.  Hopefully soon.  I need the stress relief of crochet.

The stress partially comes from the upcoming move — all the large furniture is being transferred on the 13th, so before that I want to have taken a good number of things already (the wonderful, amazing, fantastic landlord gave us the key waaaaay early).  Before that, though, the new house has to be thoroughly cleaned.  The landlord “cleaned,” but as one of my favorite books says, “no man can clean anything.”  My parents are going to help me clean this Sunday while Chris hacks through the patio jungle here at the apartment with his old chef knife.  On her first trip to the new house, Zero finally discovered that she can smell things outside through the air vents in my car:

photo

She doesn’t like sticking her head out the window — she’s a scaredy cat — so she stood like this, nose glued to the vent, for a very long time.

Looking at lovely yarns I’d like to try using calms me down a bit (so does looking on Pinterest for beautiful and clever decorating ideas).  Check these out.  The first one I’d like to try is called Vinni’s Colours (Nikkim) and was introduced to me via crochetime, and the second one is from Camellia Fiber Company and was introduced to me via one sheepish girl (she’s currently hosting a giveaway for a skein of the stuff, so sign up soon).  I added these beautiful yarns to my ever growing list of things I need to try!  Have you tried them?  What do you think?

Well that’s all for one night — I may try and read some to de-stress, or perhaps I’ll start on that crochet ripple blanket.  Or perhaps I’ll spend my time sitting around wondering what to do until it’s way past time to go to bed, so that I’m nice and exhausted tomorrow for work.  Can you tell I’m a worrier?  I get it from my mom, who got it from her mom.  At least I’ve got a very understanding ear — calling my mom always makes me feel better.  Anyway, thanks for stopping by!  Hope to see you back soon!

CAL pattern page is up

Thanks again to everyone who has watched and participated throughout not your average crochet’s first crochet along!  I have compiled all the posts into one page for your convenience.  To access this page, you can go to the menu bar: tutorials >> crochet tutorials >> patterns >> as-we-go stripey blanket.  You can also click on the button in the sidebar to the right that says “as-we-go stripey blanket free pattern.”  You can also

click here

I hope you have all enjoyed it, and don’t forget to email me pictures when you are done so that I can start that gallery!  Please include your preferred name if you want it to be included with your picture.  Send the largest version you have to davish14 AT winthrop DOT edu   Please do not hesitate to use that e-mail address or to comment here if you see any problems or mistakes in the pattern page, or if you have any questions!

Hopefully you will all stick around now that the CAL is over — I do plan on having a giveaway soon in addition to my regular knitting and crocheting posts!  I’m about to move to another city so it will probably be after that, but I promise it’s coming (and if you remember my last giveaway you’ll know it won’t be a small cheap gift)!

Thanks for stopping by, I hope to see you back soon!

CAL: the border

Hello everyone!  It’s sad to say that this is my last instructional CAL post.  I sincerely hope that each and every one of you have enjoyed watching or participating in this project; I can tell you that every part of it has been a joy for me, from actually crocheting the blanket to taking over 100 pictures to writing it all up and to answering your questions and comments.

Today’s post is to give instructions on the way I made my border (in US terms), but feel free to make it your own way or leave it off entirely.  If you do make a different border, I would recommend that your first row around your blanket be a sc row because that will help give your edges some stability.  Here’s a picture of my completed border:

cal112

It’s a pretty simple (but sturdy) sc border with a cute picot edging.  Here’s how I did it:

border row 1

Connect your chosen border color to the bottom left corner of your blanket.  Make 1 sc in each chain loop:

cal106

When you reach your corner, make sure you add at least 1 sc so that the corner will turn properly:

cal107

When crocheting up/down the sides of your blanket, spacing the stitches can be difficult.  I recommend firstly that you crochet around the entire stitch at the end of each row; it’s much easier than trying to slip your hook into the middle of each and every stitch.  When you come across a row ending/beginning in a sc, make 1 border sc around it.  When it’s a hdc, make 2 border sc around that stitch.  When it’s a dc, also make 2.  When it’s a treble, make 3 stitches around the treble stitch.  Some people prefer to do just 1 stitch around the hdc stitches, but you can experiment and see what works best for you (some people find that just using 1 stitch can make the border too tight or that 2 can make it too loose, depending on the gauge etc.).  In the case of the star stitch, I placed 3 sc on top of it:

cal108

When you reach the beginning of your border, slip stitch to close the round, ch1, and begin row 2.

border row 2

Work sc stitches into every stitch of your first border row, remembering to put in extra at the corners.  Close the round and begin row 3 the same way.

border row 3

Work 6 sc stitches.  Here’s where we make the first picot.  Start by chaining 3:

cal109

Slip your hook into the first of the 3 chains:

cal110

Yarn over and pull through the 2 loops:

cal111

Without skipping any stitches, make 6 more sc stitches in the row below.  Make another picot.  Continue making picots every 6 stitches until you come to the end.  Tie off and weave in your ends, and you’re done:

cal112

blocking

If the edges of your blanket are too uneven for your taste, feel free to wash and block your blanket according to your particular yarn label.  I myself did not do this with my blanket.

cal113

At this point my blanket is so large that I couldn’t get a good photo square on, but you can see all of the rows there.

cal114

And folded up:

cal115

Well, that’s everything!  It’s been such a pleasure having you aboard and watching your blankets develop through your pictures on facebook.  Thank you so much for making this such a special experience!

the as-we-go stripey blanket CAL pattern

I will compile all the CAL posts into one long page and stick it permanently in the menu bar at the top of this blog so you can always find it.  Some of you have expressed a desire for a downloadable PDF pattern, as well.  I’m honestly not sure if that will happen — I’ve never made a PDF pattern before and am not exactly sure how to go about doing it properly (and without making it a zillion pages long).  I will give it a shot, though, and if it works out I will post the link to it and let you know.

 If you’d please read on, I have one last thing I want to mention.

a request

I would like to arrange a permanent page on this blog as a photo gallery with pictures of everyone’s finished blankets.  When you are completely finished, I’d be so grateful if you could take a lovely picture and e-mail it to me at the photo’s full size.  Also, in the email please let me know if you would like for your name to appear with your picture, and what name I should use.  Here is the email address you can use:  davish14 AT winthrop DOT edu

Again, thank you all so much for participating — it’s really been humbling and at the same time very exciting to see this pattern taking shape all across the world.  I hope you all enjoyed it and feel free to continue to leave questions and comments about the CAL.