I’m using US terms.


what you can do with it:
This stitch pattern would be good for anything that you don’t mind having a not-so-attractive wrong side — it’s not as pretty on the back. As you can see here, Carina has made a pouf, and she is indeed the source of this pattern. Thank you Carina!
how to do it:
You’ll want to have a finished stitch count of a multiple of 2 plus 1. My swatch is 25 sts. If you want to do the same, ch 27. This pattern involves front-post double crochet stitches (fpdc) and back-post double crochet stitches (bpdc), as demonstrated below. If you don’t want the pictures, skip to the bottom of the page for the pattern written out without them.
Row 1: dc in 4th ch from hook, dc across. Ch 2 (counts as first st), turn.
Row 2: This is what you’ll have so far:
 Now we will make our first back-post double crochet: in 2nd stitch, yoh as in preparation for a regular dc. Insert hook from back to front around the actual stitch below, not into the usual working loops. Then bring the hook back to the back. It’s easiest to see what this looks like when viewing the back:
 See how the hook is around the post of the stitch below? Now, yoh and draw through that lower stitch. You will have 3 loops on your hook, just like a usual dc. Yoh and pull through 2 loops, then yoh and pull through the last 2 loops. Just like a dc. So you see, the only difference between a regular dc and a bpdc is where the stitch is anchored: the bpdc wraps around the back of the post of the stitch below.
Now we do a front-post double crochet. The technique is the same, only we go through the front first. So, yoh as you would normally for a dc, then insert hook from front to back around the stitch below, and then back to the front. It will look like this:
 Yoh, draw through that lower stitch. You’ll have 3 hooks on your hook again. Yoh, draw through 2, then yoh and draw through last 2. Again, just like a dc, only anchored to the front of the post of the stitch below. When you’ve done that, it will look like this:
 Hard to tell what it will look like just yet. Keep going down the row, alternating bpdcs and fpdcs. You’ll end with a fpdc around the ch2 that counted as the first stitch of the row below. Now your work will look like this:
 Still a bit hard to see how this will work yet, even though this is the front of the work. Let’s keep going. Ch2 and turn (counts as first st in row 3).
Row 3: work 3 fpdcs, then 1 bpdc. Repeat until end of row. You’ll end on a bpdc. Ch2 and turn (counts as first st).
Row 4: rep row 2: bpdc, fpdc, alternate until end of row. End on a fpdc. Now we’ve finished a front row, and it will look like this:
 Starting to take shape? Let’s keep going. Ch2 and turn (counts as 1st st).
Row 5: 1 fpdc, *1 bpdc, 3 fpdc, repeat from * till end of row. You will end on the second fpdc of a group of 3. Ch2, turn (counts as 1st st).
Following rows: rep rows 2 – 5. This is after row 6:
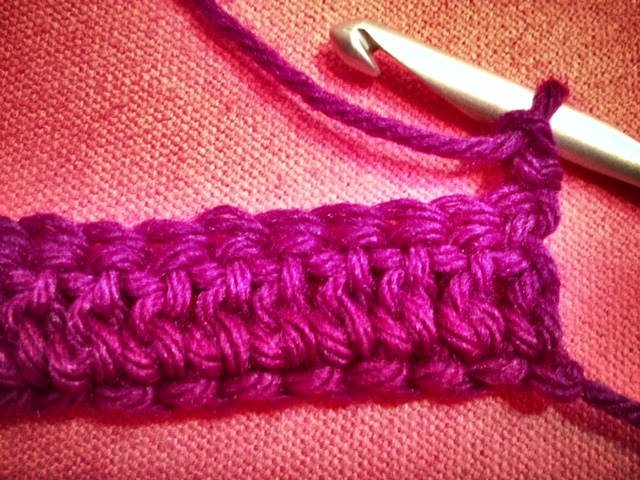
 And finally, this is after row 8:
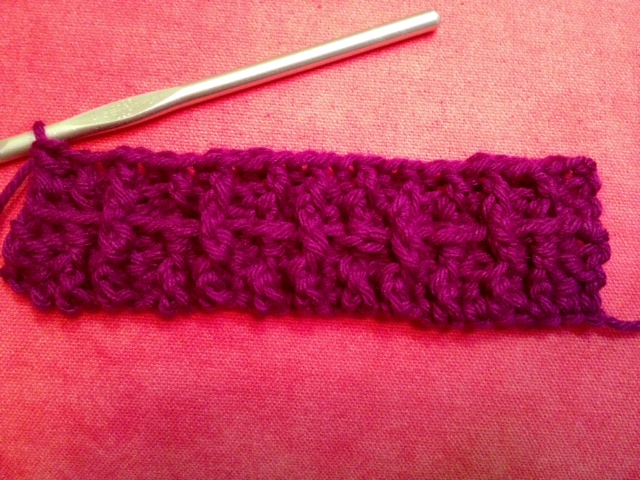
Ta-dah! You can see that the front looks nice, but the back will look like this:
 Not as nifty. Lastly, here’s a picture of the first 5 rows with each row a different color, so you can see them clearly:
 It looks interesting that way, but it’s harder to see the “woven” texture” with all of those colors.
pattern without pictures:
Ch a multiple of 2, plus 3.
Row 1: dc in 4th ch from hook. dc in each st across. Ch 2, turn (counts as 1st st).
Row 2: *bpdc, fpdc, rep from * to end. Ch 2, turn (counts as 1st st).
Row 3: *3 fpdc, 1 bpdc, rep from * to end. Ch 2, turn (counts as 1st st).
Row 4: rep row 2.
Row 5: 1 fpdc, *1 bpdc, 3 fpdc, rep from * to end. Ch 2, turn (counts as 1st st).
Following rows: rep rows 2 – 5 until piece is as long as you like.


[…] woven DCs […]
LikeLike