I love all the pictures you’ve posted on facebook and Ravelry so far! Your blankets are all looking great! Ready for the second installment? Off we go!
By now we’ve established how we’re starting rows and changing colors, so let’s skip those details now to save time. You’ve got this! Oh and don’t forget we’re using US terms!
row 6
With new color, dc in each st across
row 7
With new color, hdc in each st across

row 8
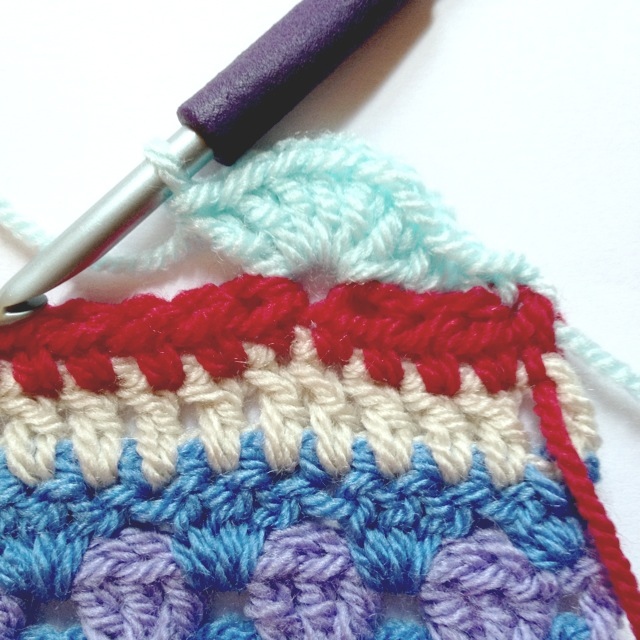
This will be the Catharine wheel pattern. DO THESE 4 ROWS LOOSELY OR YOUR BLANKET WILL HAVE UNEVEN EDGES. With new color, ch1; sc in same st:
 Skip 3 sts, 7 dc in next st:
 Skip 3 sts, sc in next st. Skip 3 sts, 7 dc in next st. Continue this shell pattern to end, leaving the last sc unfinished so as to change colors:
 row 9
row 9

Remember to keep your stitches loose! With new color, ch 2:
 In the next 3 sts, make a dc but do not pull the last loop through any of them yet:
 When you have 4 loops on your hook and it looks like this, yo and draw through. We’ll call this a “cluster” of 4:
 Ch 3, sc in top/middle stitch of the bottom shell. Ch 3, in next 7 sts dc but do not finish stitches, as in the beginning. Yo and draw through to finish the st (making a “clutster” of 7). Ch 3, sc in top of shell below. Continue this pattern until the end. The last “cluster” will be 4 sts only:
row 10
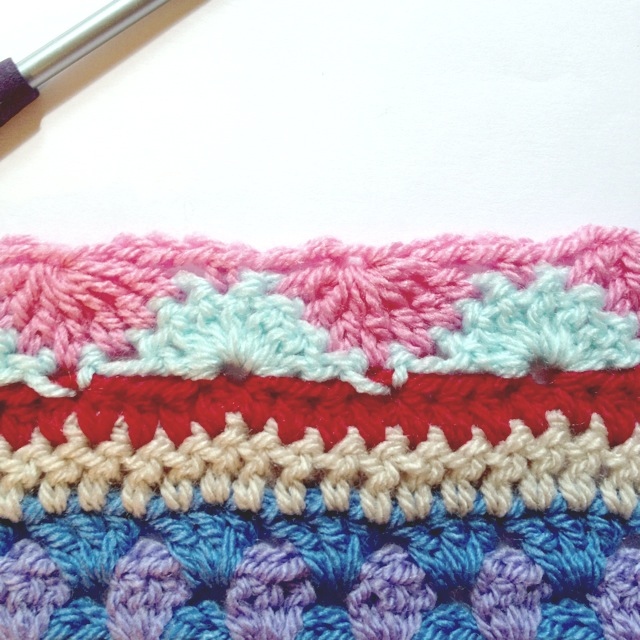
Remember to keep your stitches loose! With same color, ch3 and dc 3 in first stitch; sc in the sc below:
 In the center space of the next “wheel,” dc 7. Sc in next sc. Continue this shell pattern until end:
 In the last st, there is only half of a shell to be made, so dc 4 and prepare to change back to the same color as our first row of the Catharine wheels:

row 11
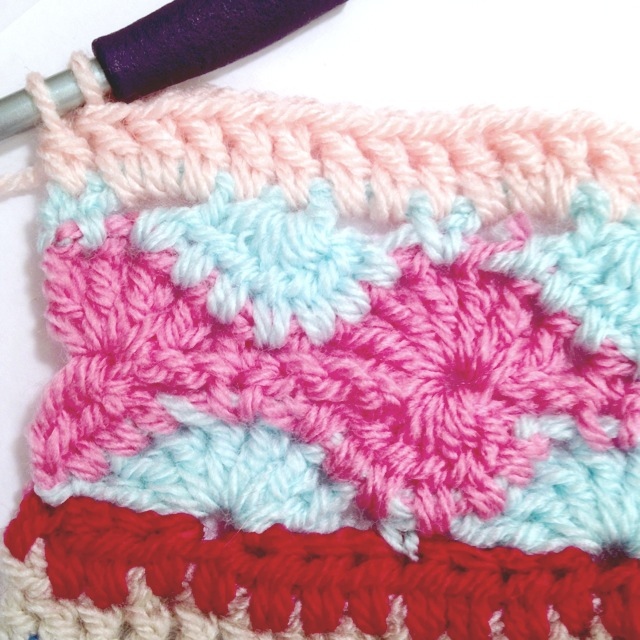
Don’t forget, loose stitches! Ch 1, sc 1 in same st:
 Ch3, make the same “cluster” of 7 dcs as in row 9, ch 3, sc in top of shell. Continue until end:
Leave the last sc incomplete, as per usual, to change to the next color:
row 12
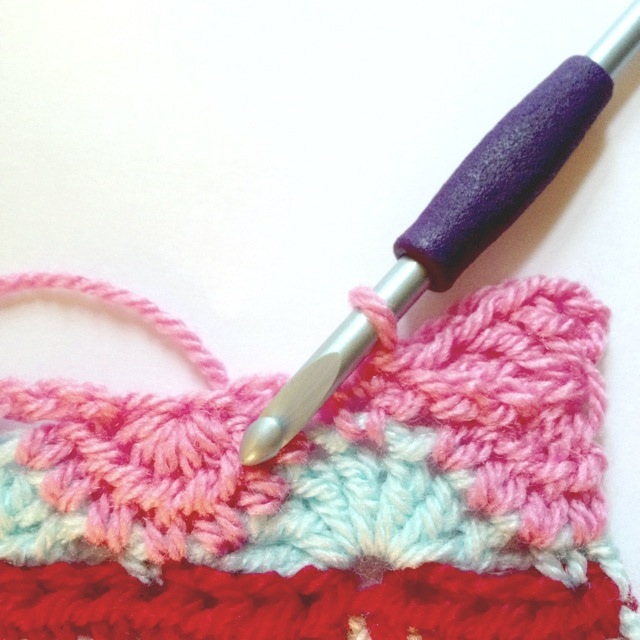
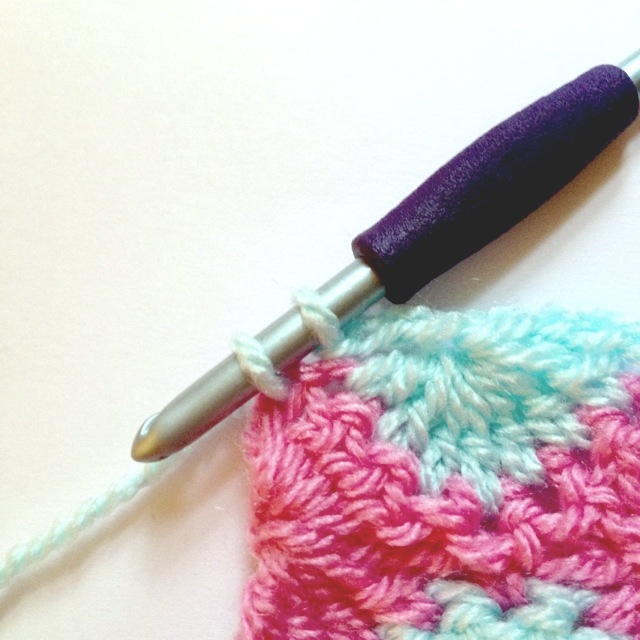
Back to regular tension. This is a row of dc, but the tricky part is getting the right number of stitches. Ch 3 to count as first st:
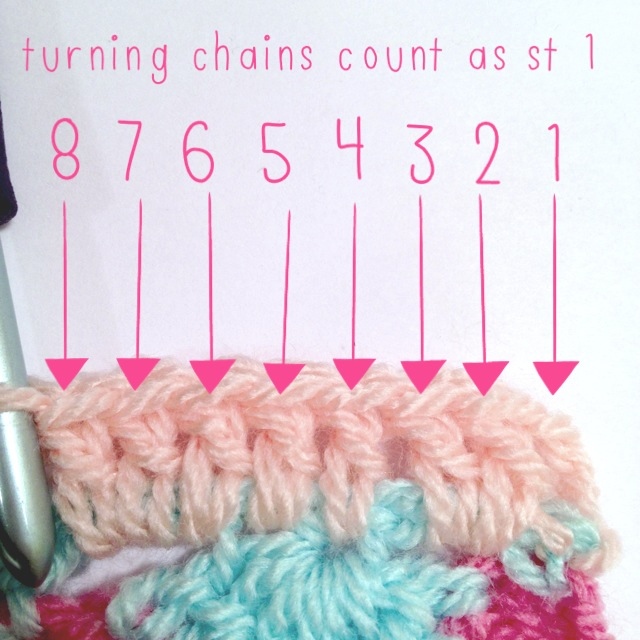 You can see that stitches 2 and 3 are around the chain below, stitch 4 is in the “eye” of the wheel, stitch 5 is in the stitch right before the next ch 3 space, stitches 6, 7, and 8 are over the next ch 3 space. Continue this method of 8 stitches until the end. Keep track by remembering that each sc in the row below signals stitch 1 of the pattern of 8. Dc in last st:
 Before moving on to the next row, count your stitches to make sure you have the same amount as when you started the blanket.
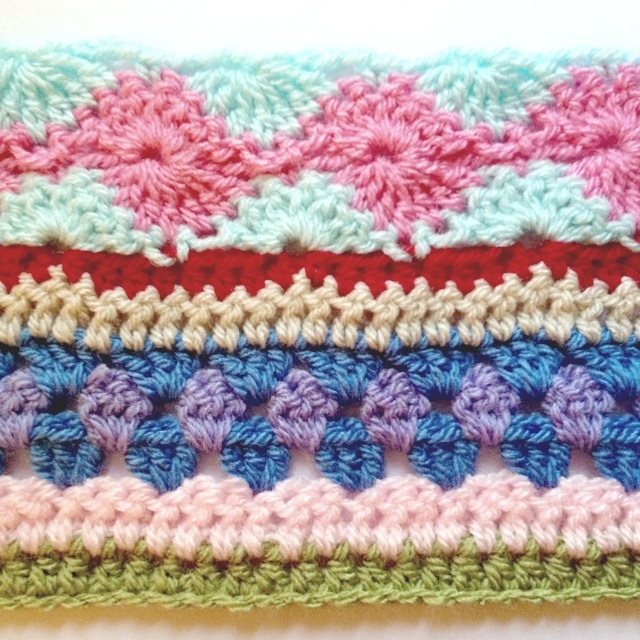
row 13
In new color, hdc in each st across:
 That’s all for this week! I hope it’s not too much at once, but it was pointed out to me that at the pace of 6 rows a week we would probably not finish by Christmas (which was the original goal, so that we may gift our blankets to others if we wish). Since so many of you finished within a couple of days last week, I thought adding 2 more easy rows wouldn’t be out of line.
If you have any questions, please feel free to ask. I know that the Catharine wheel pattern can be tricky and it is a bit difficult to explain. Hopefully the pictures will be enough to get you through so that you get the hang of it, but if not it’s OK, just ask about it and we can work through it together! Good luck and happy hooking!


Oh yay! I pressed ‘refresh’ one more time, and there was your new post! 😀 I’m certainly up for an extra couple of rows. I’ve not done the Catherine Wheel pattern before, but it looks so pretty. Will get started right this minute. Thankyou thankyou thankyou x
LikeLike
I agree with Terrimm! Yay!!
LikeLike
Ooo, a tricky stitch! I had a go at the Catherine wheel stitch last week and my swatch did end up pulling in a bit at the sides – I’ll try to remember to work loosely! Will post a photo when it’s done 🙂
LikeLike
Rows are done!! Thanks so much!! I had church and a luncheon today and ended up brining my yarn with me and worked on it every spare moment I had! 🙂
LikeLike
Would it be best to go up a needle size for the C. Wheel?
LikeLike
That would probably work just fine! 🙂
LikeLike
It was importante to me your notice to do the shell pattern loosely. Without it , I couldn’t do the row properly and the job was not working for me.
LikeLike
Found the Catherine wheels a bit tricky.. not sure what I did wrong but it worked when I did it the second time! x
LikeLike
I’m glad you made it! It is a tricky stitch pattern, you’re right. Took me a few tries, too! 🙂
LikeLike
It’s being too tricky for me… I had to undo and now I”ll start rows 9 and 10 again. I don’t know if I’ll suceed and certainly I’ll bel ate this week.
LikeLike
That’s ok! If it gets too frustrating feel free to just do dc or hdc rows instead! Or if you want to post pics on the Ravelry group page or the Facebook page maybe I or someone else could help? Whatever you want to do! 🙂
LikeLike
Earlier this week, the Catherine wheel made me unravel the beginnings of my blanket and start over … The stitches were torn with gaps and loops in the wrong places. I am using a smaller hook now (2.5 = somewhere between B/1 and C/2). Consequently, I had to chain some more stitches to keep the width of my blanket (216 now instead of 168) and each row seems to take forever …
Last night, I was again challenged by the wheel but I do like the outcome a lot better (so far). Thanks for posting new stitches and rows.
LikeLike
Oh no, I’m sorry you had to rip out everything! The Catharine wheel stitch pattern is a tough one but I’m glad it got better the second time!
LikeLike
I have just joined in. I’m a little behind, having only started this last night but will crack on with week 2 tonight and then post a photo. It’s such great fun. Thank you for the time you’re putting into this. The inspriation blanket is a beauty. Mine is a rainbow too.
LikeLike
I’m glad you’ve joined in, and I’m glad you’re liking it so far! Can’t wait to see your finished product!
LikeLike
I managed to make my wheels today! I’m so happy! Tomorrow I’ll do the last two rows for this week.
Your fotos saved me, Hannah!
LikeLike
I’m glad the photos were helpful! I can’t wait to see your blanket!
LikeLike
I just found this super fun CAL, so I’m a little late. I am loving it so far! I am only using yellow, blue, and white bc it reminds me of sunshine on the lake. 🙂 somehow I lost two stitches during the wheels. Oh we’ll, it’s just for me anyway. I’ll just do sme increases in the hdc row. I plan on making a smaller, more colorful version later as a baby blanket. I’ll get it right on that one.
Thank you for sharing this! I am in love already. ❤
LikeLike
I’m so glad you’re joining in! Your colors sound lovely — I hope you post pics on the Facebook page so we can all see! 🙂
LikeLike
Just done my Catherine a wheels tonight. Only ripped it out once – I had forgotten some of my chain 3s. It’s pulling in a little but I think it will be fine when I steam block it. Didn’t think I would like it but its very pretty.
LikeLike
I’m glad it didn’t give you too much trouble, and that you like it after all! Mine pulls in a bit too — I’m counting on the blocking process!
LikeLike
I just started this CAL and I’m having lots of fun! Until now, that is.. I’m doing the first Catherine wheel row (row 8) and I end up with 4 stray stitches at the end! It’s very odd.. I’ve checked and checked again, but I do have 3 “empty” stitches between the sc and the shell base everywhere, and I started with a foundation row of 193 so I thought it should be fine. Any ideas?
LikeLike
Hmm… Well you’re right about needing 193 stitches in each row! Did you check that your row below the Catharine wheels still has 193? It’s easy to add stitches at the beginning and end of rows without meaning to (in fact, I have with this blanket already, so one of my sides is a little wonky). If that’s not the problem, could you take a picture and post it on the facebook wall? Without seeing it I can’t visualize where this particular problem may be happening. Hopefully it’ll be an easy fix! 🙂
LikeLike
Thank you so much for helping, of course it turned out I had miscalculated. I frogged it this afternoon and redid it, counting carefully along the way and everything was fine this time. I’m impressed I managed to fail at least 4 times on a 193 stitch length… Oh well, now everything is ok 🙂
LikeLike
That’s OK! Getting (and keeping) that number is difficult — I had to start over a couple of times myself! 🙂 I’m glad you figured it out!
LikeLike
ok…..
row 8 the first row of the wheel, the yard between each set of seven DC where you SC….my yard does not have the smooth even look of your example. Mine is long and stringy from the DC to the single crochet, so when I start the second row and have to crochet into those spots…it looks pretty crappy 😦
how do you get the “wheel” to look like the top of the DC is flowing into the SC rather than ending up with these huge stringy gaps? I have worked all the way to the third row and had to pull it all out because it is all katty-wompus.
Tips? I’ve tried to keep it loose, but it is not helping at all. Where specifically is the loose? because it looks like your SC is pretty secure in the picks.
thx!
LikeLike
To be honest mine have a few gaps too, but I think I know what you mean. And I love that you just said “katty-wompus.” 🙂 I crocheted the dc stitches loosely so that they’d stretch to the sc stitches and not pull the whole blanket in on the sides. In the second row of the wheel the chain 3 bits were also very loose (again to keep the blanket from pulling in). Some people used a hook size up from what they were originally using for the Catharine wheel bits, so that might help. Let me know how you get on — I hope this helped! If you don’t like the way it turns out you can always substitute 4 rows of something else.
LikeLike
😀
Thx! I did what you suggested, DCs loose and it did help a lot. I just finished that first row and will start the second today. This is a hard one!
LikeLike
I’m glad that made it better! The Catharine wheels are pretty tough — my hands are always tired after I do just a couple rows!
LikeLike