everything you need to know about knitting & crocheting tools/extras

Two weeks ago I posted “everything you need to know about crochet hooks” and last week we learned “everything you need to know about knitting needles.” This info is also from 2011 and is permanently available in the menu bar but I thought it worth revisiting!
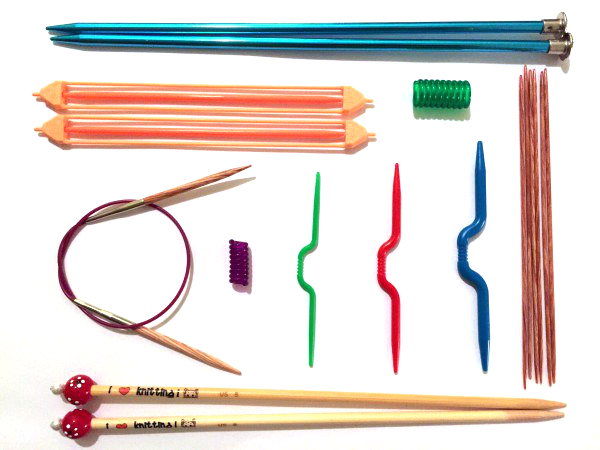
extras for knitting and crocheting

stitch markers

Stitch markers have been unnecessary in every crochet pattern I’ve ever attempted — a scrap piece of yarn marks your spot just as well and doesn’t cost you extra.  They’re much more useful in knitting, at least for me.  They do make markers that look like jewelry if you just want to look pretty, like the glass beaded ones in the tin above.

needles

OK so you do need sewing needles to sew the ends of your yarn into your project.  Just make sure you find some with big enough eyes for your yarn.  The big ones are called tapestry needles.  If you want to get organized you can get a metal magnetic tin for your needles and stitch markers, as seen above.

scissors

Duh.

measuring tape

A cute one is always fun, like the Cath Kidston retractable one above.

needle/hook sizer

Useful if all of your needles or hooks aren’t clearly marked with their size.  The Susan Bates one above is also good for checking knitting gauge!

thread cutter pendants

These thread cutters hang from a necklace so can be kept with you at all times, and they’re very handy.  I totally had to get one because it’s more convenient than digging around for my scissors, and it’s just awesome!  Even works on thicker yarns.  I got the Clover brand.

row counter ring

These are so handy!  Mine is handmade by a woman on Etsy (click here for more info).

wire yarn stranding guide

This ring is specifically for when you are knitting with more than 1 color/ball of yarn at once.  It helps keep the tangles at bay and can be found cheap.

beads (not pictured)

It can be fun to add beads to your crocheted work, but unless the pattern calls for it, I’d stay away from beading!  When you’re crocheting you have to put all your beads for the project on the yarn before you start, because there’s no way to add them as you go along (unless you tie them on with sewing thread or something, but who wants to do that?).  That means you have to count EXACTLY how many beads you will need and TRIPLE check that you’ve put that number of beads on the yarn before starting.

everything you need to know about knitting needles

About a week ago I posted “everything you need to know about crochet hooks” and now it’s the turn of the knitting needles! This info can always be found in the menu bar of my site, but I thought it worth revisiting!

intro to knitting needles

brands

My favorite brand is KnitPicks, because their needles have pretty sharp points, they’re strong, and they are warm in the hands (at least, the birch ones are!).

sizes

From wire-thin to tree-branch huge, what you need will be on the back of the yarn you want to use, or in the pattern you’re using.  Check out this handy chart to see the two kinds of sizing (metric and U.S.) and how they match up!

types

Circular or straight needles is a choice that is sometimes made for you if the pattern calls for circular, but you can still make non-circular items with circular needles, and some people swear by doing so!  There are many lengths of circular needles, so getting a collection can be expensive (check out the interchangeable sets mentioned next for a solution!).  You can use what knitters call the “magic loop method” to knit smaller tubular items, but I find the loopy “wings” cumbersome.

Interchangeable needles are my favorite because you can buy one set and basically have your sizes and lengths covered, and you can use them as circular or straight needles. Much more cost efficient than trying to collect all the other kinds of needles because they do pretty much everything. The only downside I can spot is that sometimes I just want to knit with straight needles, so I do have a set of those too.

Double pointed needles (or DPNs) are necessary many times when you are making a small tubular object that even the shortest of circular needles are too long for (unless using the “magic loop method” mentioned above), like socks or mittens.  Some people say it’s like fighting a giant stiff-legged spider to use these, but I enjoy them for the most part.

lengths

When using straight needles, you’ve got options from short to long.  If I’m making a skinny scarf, I don’t want 10 extra inches of needle flailing around, poking my dog or my boyfriend beside me, so I’d choose shorter needles.  If I’m casting on for a sweater or large item, longer needles might be required.

materials

This is a personal preference, but there are some points to consider.  Some silkier yarns slide too much on aluminum needles, and some wool yarns are hard to slide on wooden/bamboo needles.  Plastic needles can be a bit bendy, which can affect your gauge by making your stitches slightly looser, so be careful and choose your needle material wisely with the yarn material in mind!

extras

Stitch holders, as seen above in orange, come in a variety of sizes and will securely hold live stitches if you need to use your needles for something else, like another portion of your project or a whole other project all together.  Scrap yarn can serve this purpose just as well if you don’t want to purchase the holders.

Cable needles are short double ended needles (as seen above) that often have a dip or groove in the middle and are used to hold live stitches when cabling and are particularly useful if your cables have more than 4 stitches.  I definitely recommend these for cabling beginners!

Coil wraps, as pictured, are little springy coils that help keep your straight or double pointed needles together.  Just wrap the coil around your pair of needles and they’ll never get separated again.

Point protectors (not pictured) are useful if you travel with your knitting a lot, but I personally don’t have any.  If I did I might avoid stabbing myself in the hand when I reach in my purse…

Circular knitting needle accessories (not pictured) such as keys, various cable lengths, cable connecters, end caps, and ID tags are useful if you’ve got a variety of projects going on at once.  I got all of these things from KnitPicks, myself.

first knitted socks — ta-da!

If you follow me on Instagram, Twitter, or Ravelry, you may have noticed already that I’ve finished my first pair of knitted socks!

Hannah's first knitted socks on notyouraveragecrochet.com

And boy howdy, am I pumped about these.  According to Ravelry (and I’m a bit ashamed to admit it), they took over 2 years to complete!

Calling for worsted weight yarn, these socks feature Judy’s Magic Cast On and a Fleegle Heel.  I was supposed to do an Invisible Ribbed Bind Off but I was so excited to be done that I didn’t want to take the time to have to learn something new and I just used a regular knit bind off with large needles.  This was almost a huge mistake — I can barely get the cuff parts over my heels because of it!  They do fit, though, so that’s fantastic!

If I ever get enough motivation to make another pair of knitted socks, I think I’ll use sock-weight yarn.  This yarn is one of the softest I’ve ever felt but because the stitches are bigger (comparatively speaking, to the stitch size of sock-weight yarn), I can feel them on my heels and the balls of my feet when I walk.  It’s a bit uncomfortable — I wouldn’t go to work or anything with them, but I’ll wear them at home all the time!

Check out my Ravelry project page to see more about the yarn and needles used, etc.

Hannah's first knitted socks being all cozy on notyouraveragecrochet.com

To all you sock makers out there, I had forgotten how hard it is to take pictures of my own feet! Do you have any tips?  Also, do socks you’ve made with bigger yarn feel less comfortable when walking than socks made with thin yarn?

Well, that’s all for today.  I’m off to do a little bit of cleaning — we have friends coming over today!  Thanks so much for stopping by, see you next time!

Phoenicia ta-da!

2015 is starting off pretty productive (as far as yarncrafts go). My latest knitted wrap/shawl thing is complete! Introducing… Phoenicia!

Phoenicia knitted shawl/wrap on NotYourAverageCrochet.comThe pattern is available on Ravelry for $5.50 (click here).  There are many ways to make this shawl, but I followed the designer’s method (except I left off the picot edging).

I used 305 yards of DyeForWool’s Fingering Merino/Baby Camel in the Dyeing Rose colorway.  This is the leftover yarn from the hat I made when I reviewed this yarn a while back (click here for the full review).  This yarn is so lovely and soft and warm!

Closeup of Phoenicia shawl/wrap on NotYourAverageCrochet.comI really like the fan type lacy pattern of this one — it’s different from the very popular leaf style that seems to be all the rage these days, so it seems refreshing.

After blocking the wingspan was 70″!  Can you believe I got that much out of just 305 yards of yarn?  I couldn’t either.  Super impressed with this.  And finally, to demonstrate how it looks on:

Phoenicia shawl/wrap modeled on NotYourAverageCrochet.com

Plenty of room to let it hang loosely, and it won’t fall off due to a short wingspan like many shawls I’ve seen.

I love it and I can’t wait to wear it with the hat I made with this yarn!

Thanks for stopping by!


“As You Wish” wrap: Ta-da!

Here’s my last FO for 2014:

As You Wish knit wrap completed by Hannah at notyouraveragecrochet.com

It’s the As You Wish wrap/shawl by Boo Knits (available on Ravelry for a small price).

Yarn used: KnitPicks Hawthorne Fingering in Belmont colorway, 1 skein

Needles used: US 7, 8, 9, and 10, respectively

Size: about 64″ across once blocked (163cm)

As You Wish wrap - more photos and link to pattern at notyouraveragecrochet.com

The wool/nylon blend yarn is nice and soft, and the colorway is GORGEOUS.  The photos don’t really do it justice.  It’s a pretty decent price over at KnitPicks, too.  It blocked nicely and has a lovely drape:

As You Wish wrap - more photos and link to pattern at notyouraveragecrochet.com

This wrap/shawl is a good weight for winter here in South Carolina; we’re averaging lately in the 50s and 60s (F) so it’s not near freezing or anything.  For other, chillier areas, this would probably be good for Spring or Fall.

Here’s a photo of the right side of the work:

As You Wish wrap - more photos and link to pattern at notyouraveragecrochet.com

And the right side of the ends:

As You Wish wrap - more photos and link to pattern at notyouraveragecrochet.com

I really like it, and the pattern wasn’t hard to follow — it wasn’t frustratingly difficult or boringly easy.  You really do mix and match parts of the pattern to make the shawl quite literally as you wish.  For details on exactly how mine was constructed, visit my Ravelry project page and check out the notes.  And can you believe this decent sized wrap just took one skein of yarn?  I’m really happy about that.

Well, Thanks for stopping by, that’s all I’ve got for today!  See you soon!