


Starting a new row of dc (US terms) with a ch3? Try this instead, I bet you won’t do the ch3 ever again! This is what I’m using for my crochet clamshell blanket!

click here
You can find the page any time in the menu bar!
Thanks for stopping by!
Starting a new row of dc (US terms) with a ch3? Try this instead, I bet you won’t do the ch3 ever again! This is what I’m using for my crochet clamshell blanket!
You can find the page any time in the menu bar!
Thanks for stopping by!
Finally, something crochet to share with you! I’ve started a blanket using the clamshell tutorial from Cherry Hart (click here for free pattern). This has been on the to-do list literally for years!

So far, so good. I changed a couple things in the pattern: I did a foundation sc rather than a chain and row of sc, and I’m using a different stitch when the pattern says to ch 3 at the beginning of a row, just to make it look neater. The pattern is not hard to memorize and is easy to work.
Here’s the color palette I’m working with:

It’s KnitPicks’ Brava Sport yarn, which is really soft. I think the dark purple will be for a border.
Well that’s all for now. There’ll be an update soon! Thanks for stopping by!

Stitch markers have been unnecessary in every crochet pattern I’ve ever attempted — a scrap piece of yarn marks your spot just as well and doesn’t cost you extra. They’re much more useful in knitting, at least for me. They do make markers that look like jewelry if you just want to look pretty, like the glass beaded ones in the tin above.
OK so you do need sewing needles to sew the ends of your yarn into your project. Just make sure you find some with big enough eyes for your yarn. The big ones are called tapestry needles. If you want to get organized you can get a metal magnetic tin for your needles and stitch markers, as seen above.
Duh.
A cute one is always fun, like the Cath Kidston retractable one above.
Useful if all of your needles or hooks aren’t clearly marked with their size. The Susan Bates one above is also good for checking knitting gauge!
These thread cutters hang from a necklace so can be kept with you at all times, and they’re very handy. I totally had to get one because it’s more convenient than digging around for my scissors, and it’s just awesome! Even works on thicker yarns. I got the Clover brand.
These are so handy! Mine is handmade by a woman on Etsy (click here for more info).
This ring is specifically for when you are knitting with more than 1 color/ball of yarn at once. It helps keep the tangles at bay and can be found cheap.
It can be fun to add beads to your crocheted work, but unless the pattern calls for it, I’d stay away from beading! When you’re crocheting you have to put all your beads for the project on the yarn before you start, because there’s no way to add them as you go along (unless you tie them on with sewing thread or something, but who wants to do that?). That means you have to count EXACTLY how many beads you will need and TRIPLE check that you’ve put that number of beads on the yarn before starting.
Hello everyone! Today Fibi the Fox was completed, and it’s time to share her with you!

If you ignore the quantities of dog hair that grace the cushion (that stuff NEVER comes all the way off!!!), Fibi turned out well. The pattern is available for sale over on Ravelry for about $6.39, if you want to check it out!

I used KnitPicks Palette yarn for the body, and a scrap of Cascade Heritage Paints for the scarf. The arms are a bit long, but that’s because the gauge is looser than the gauge of the body (that’s what happens when you lay a project aside for a while, I guess).
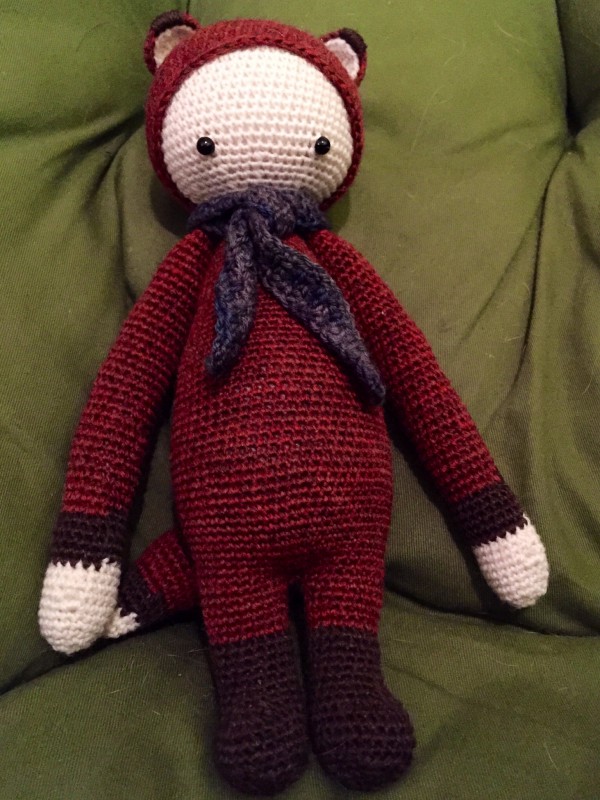 This actually took a while to do — amigurumi in general does, I find, because of how tight you have to crochet and all of the nooks and crannies and sewing together of parts. It’s worth it though!
That’s all for today. Thanks for stopping by! I hope you’re enjoying the “everything you need to know about _______” posts (knitting needles & crochet hooks)– there’s one more coming up soon!

My favorite metal hooks are Susan Bates, hands down. I find them more ergonomic than Boye hooks due to the shape of the actual hook and its alignment with the handle.
There’s quite a range! Most yarns say on the label what hook sizes are most appropriate, as do most patterns. However, I personally don’t follow these guides all the time, because I find that they tend to make looser stitches than I like. There are also different methods of sizing: metric sizing and US sizing being the most predominant. It’s good to be familiar with both, so if I see a pattern that calls for a 5.00mm hook I can automatically say “OK, that’s an H-8, I think I have a couple in my collection” or vice versa. Click here for a comparison chart.
Another tip: the material your hooks are made of actually do make a difference in how you crochet. Plastic hooks are more flexible and so tend to make looser stitches than metal hooks do, for instance. Not a huge deal, of course, but a matter of personal preference, and there’s lots to choose from! Bamboo or wood has more of a grip, and therefore is perfect for slippery yarns like silk, whereas aluminum/metal hooks are more slippery and might fare better with wool blends. Bone or horn hooks are usually antiques and can be really fancy/expensive, although the one above was not.
One thing you can do to make your hooks more comfortable to hold is to get little grippies — like those things you put on your pencils in 3rd grade. They sell packs of different sizes at places like Michael’s, so you don’t have to search far, and they’re cheap.
 Hi, I'm Hannah! Click on my face to learn more about me & this blog & all the awesome stuff that goes on here.
