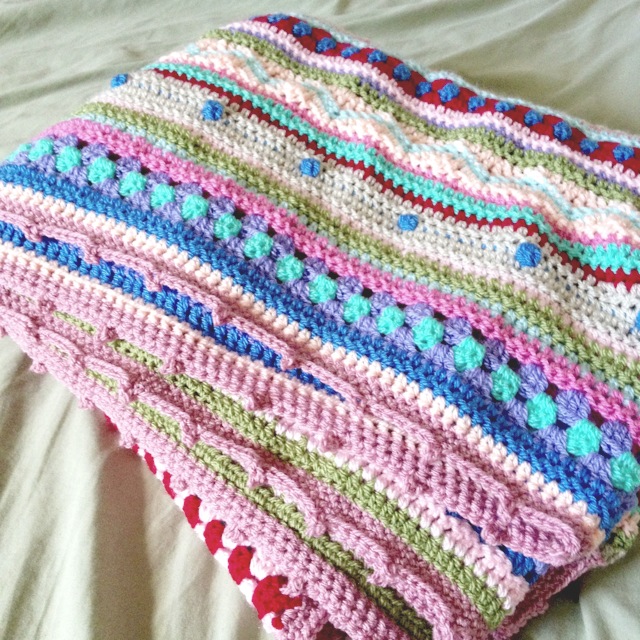
Here is the finished pattern for the as-we-go stripey blanket that was written up during not your average crochet’s very first crochet along! I hope you enjoy it! (Click here for the PDF version that does not include the step-by-step photos; click here for the PDF version that does include the step-by-step photos.) Please feel free to post any pictures to the Ravelry group page or the new facebook page — I’d love to see! Here is the finished blanket:

And don’t forget, I’m using US crochet terms! Here’s a handy chart:

materials
For my throw sized blanket I used 11 skeins of Stylecraft Special DK (in shades Parchment, Meadow, Fondant, Sherbet, Aspen, Apricot, Candyfloss, Lavender, Aster, Lipstick, and Pale Rose for the border). It was a close call though, so if you plan on making something larger than a throw I’d definitely get two balls of each color (but you could still just get 1 for the border color). You can use any colors or indeed any kind of yarn that you would like!
Hook size H/8 (5.00 mm), or whatever hook suits your specific yarn.
Scissors & yarn needle.
foundation chain
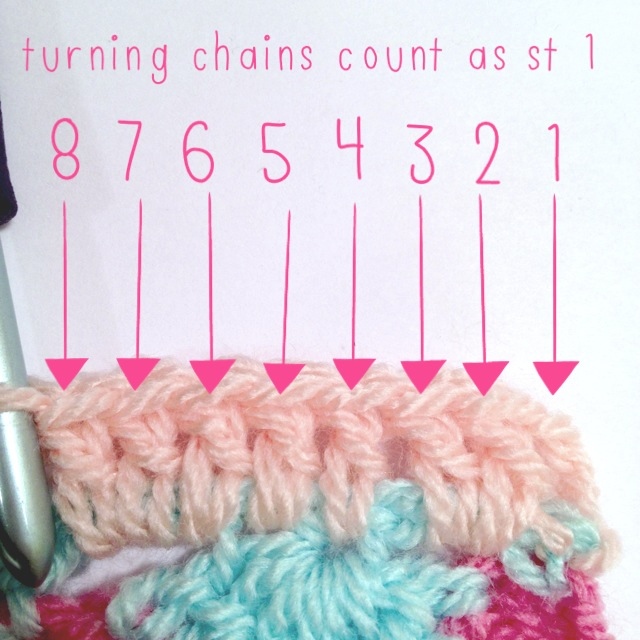
Begin by chaining any multiple of 24 (i.e. 96, 120, 144, etc., and don’t chain too tightly!). Then chain 2 more for our turning chains. With my DK weight yarn and my H/8/5mm, I chained 194 total to make my throw about 50″/127cm wide, but you make yours however long you want to! As long as it’s a multiple of 24 plus 2 you’re fine! Double, no, TRIPLE check you have the right number so you don’t have to start over later! Edit: I should also say that because the 2 turning chains count as your first hdc, you should have an odd number of stitches for every row in your blanket (you will have a multiple of 24 + 1 stitches). So for example, since I chained 192 + the 2 turning chains that count as 1 stitch, I will have 193 stitches in all of my rows.
row 1
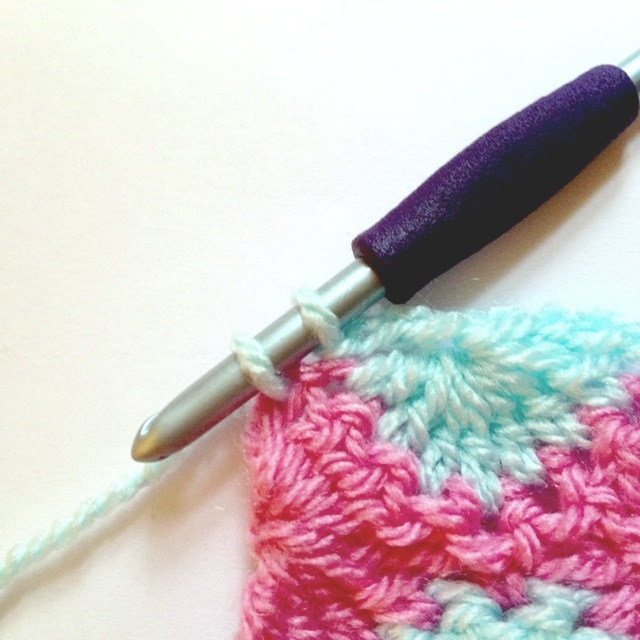
In the 3rd chain from your hook, make 1 hdc:

Make hdcs all the way across, but don’t pull the final loop through the last stitch! Stop at this point:
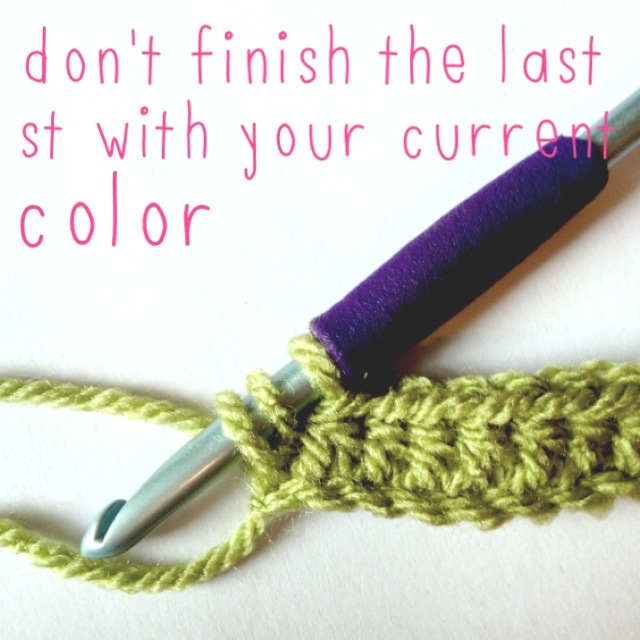
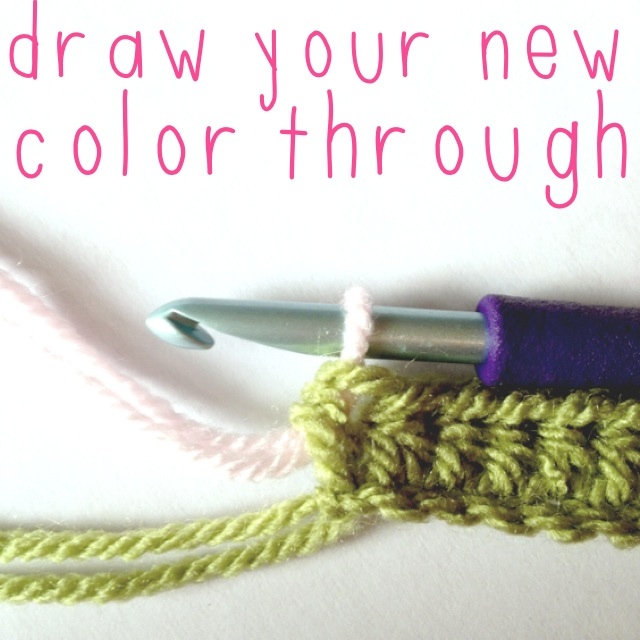
To finish the row, pull your next color through to finish the stitch. This is how we will finish every row where we change colors:
Ch 3 and turn.
row 2
The turning chains count as your first stitch of the row (and will for all rows to come unless otherwise specified). dc in each stitch across. You can work over your tails for rows like this so that you don’t have to sew them in later:

I like to crochet over the tail for at least 5 inches before snipping the end of it. At the end of this row, pull your next color through, ch 3, and turn.
row 3
Make 1 dc in the 1st stitch:

Skip 2 sts, work 3 dc in next st:

Continue this until the end, making only 2 dc sts in the last st of the row. Pull next color through, ch3, turn.
row 4
Make 3 dc in space between the 3 dc clusters in the row below:

Repeat this pattern until the end. Make 1 dc in the top of the turning chains of the row below:
Change colors. I’m using the same one as row 3. Ch 3, turn.
row 5
Repeat row 3! Then:

Don’t leave your ends unwoven til the very end, or you’ll never want to do them! I suggest doing them after about every 6 – 8 rows.

row 6
With new color, dc in each st across
row 7
With new color, hdc in each st across

row 8
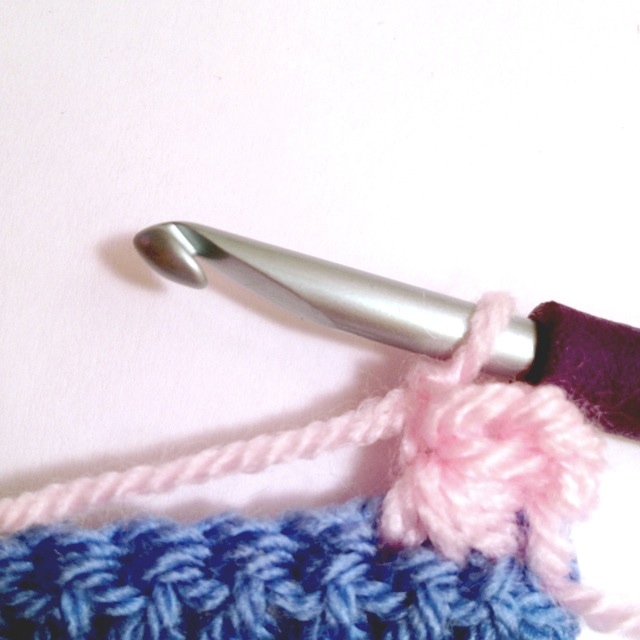
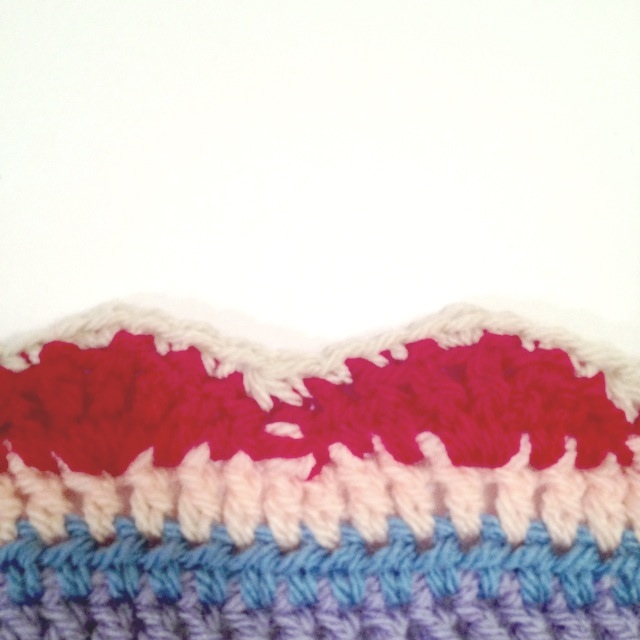
This will be the Catharine wheel pattern. DO THESE 4 ROWS LOOSELY OR YOUR BLANKET WILL HAVE UNEVEN EDGES. YOU CAN DO THIS BY GOING UP A HOOK SIZE FOR THIS BIT IF YOU PREFER. With new color, ch1; sc in same st:
 Skip 3 sts, 7 dc in next st:
 Skip 3 sts, sc in next st. Skip 3 sts, 7 dc in next st. Continue this shell pattern to end, leaving the last sc unfinished so as to change colors:
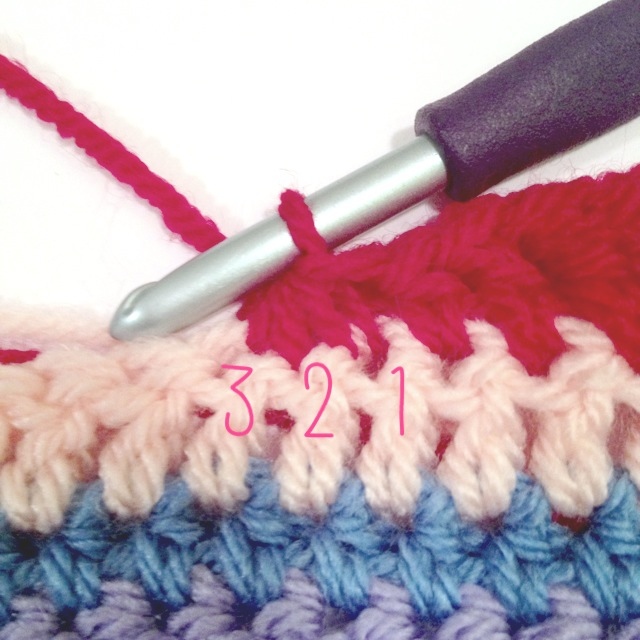
 row 9
row 9

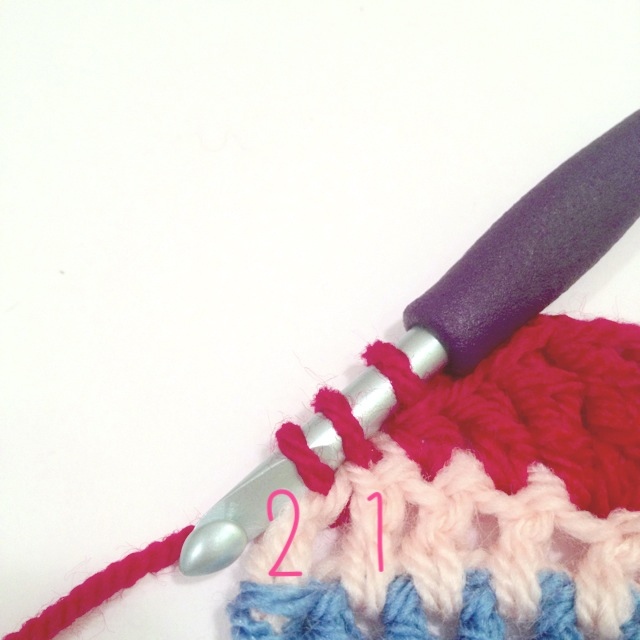
Remember to keep your stitches loose! With new color, ch 2:
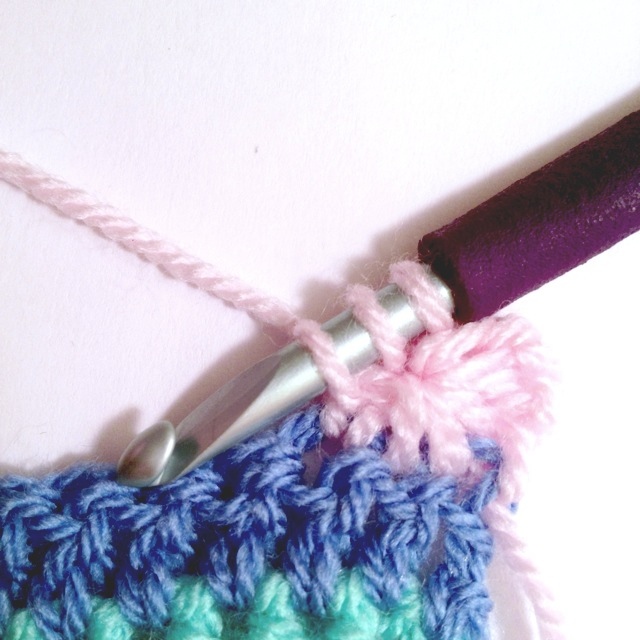
 In the next 3 sts, make a dc but do not pull the last loop through any of them yet:
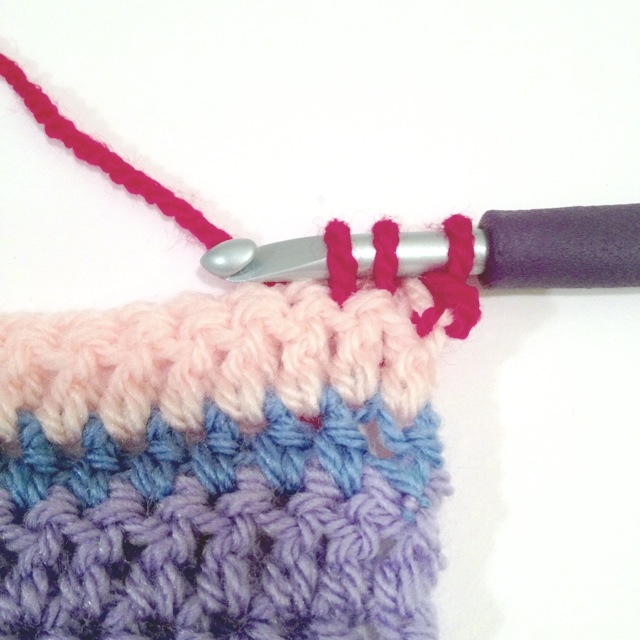
 When you have 4 loops on your hook and it looks like this, yo and draw through. We’ll call this a “cluster” of 4:
 Ch 3, sc in top/middle stitch of the bottom shell. Ch 3, in next 7 sts dc but do not finish stitches, as in the beginning. Yo and draw through to finish the st (making a “clutster” of 7). Ch 3, sc in top of shell below. Continue this pattern until the end. The last “cluster” will be 4 sts only:

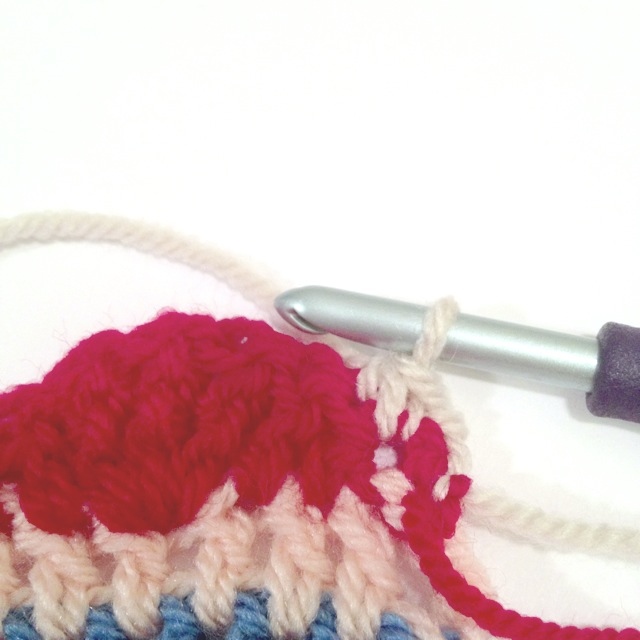
row 10
Remember to keep your stitches loose! With same color, ch3 and dc 3 in first stitch; sc in the sc below:
 In the center space of the next “wheel,” dc 7. Sc in next sc. Continue this shell pattern until end:
 In the last st, there is only half of a shell to be made, so dc 4 and prepare to change back to the same color as our first row of the Catharine wheels:

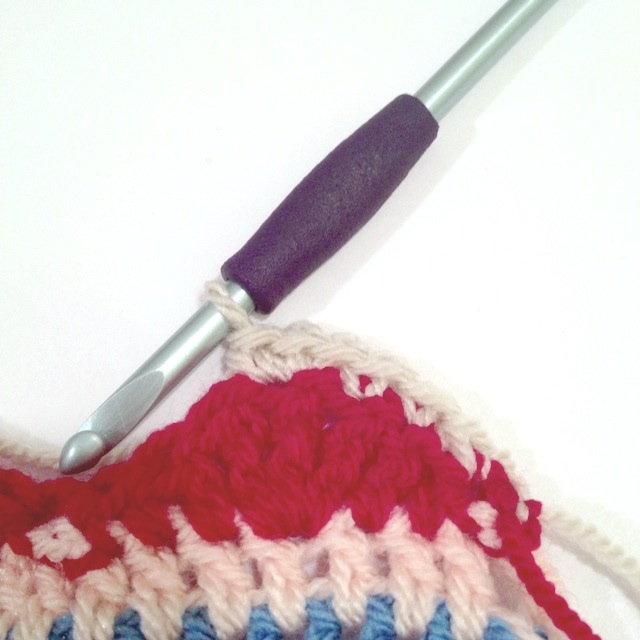
row 11
Don’t forget, loose stitches! Ch 1, sc 1 in same st:
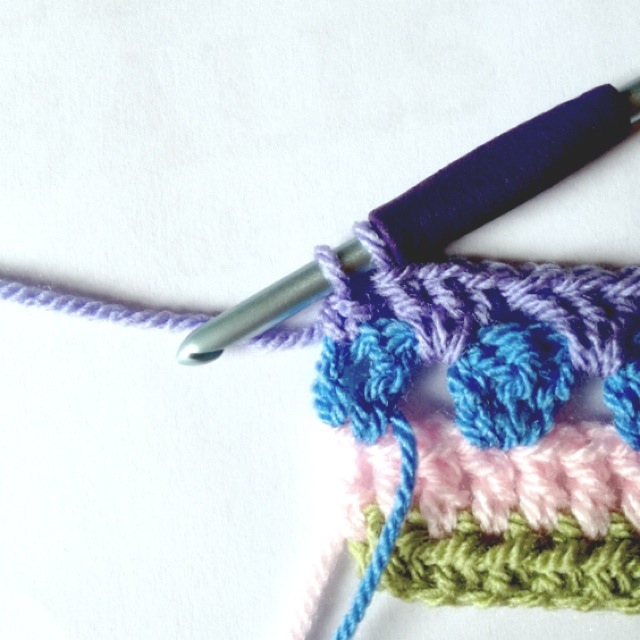
 Ch3, make the same “cluster” of 7 dcs as in row 9, ch 3, sc in top of shell. Continue until end:
Leave the last sc incomplete, as per usual, to change to the next color:
row 12
Back to regular tension. This is a row of dc, but the tricky part is getting the right number of stitches. Ch 3 to count as first st:
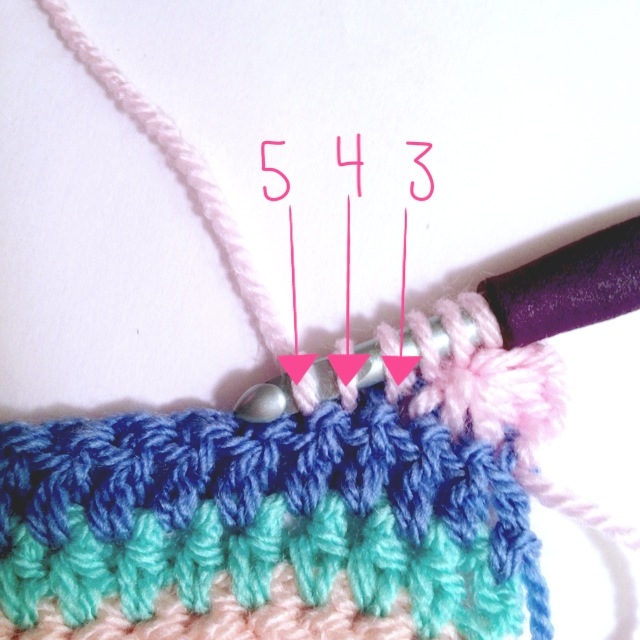
 You can see that stitches 2 and 3 are around the chain below, stitch 4 is in the “eye” of the wheel, stitch 5 is in the stitch right before the next ch 3 space, stitches 6, 7, and 8 are over the next ch 3 space. Continue this method of 8 stitches until the end. Keep track by remembering that each sc in the row below signals stitch 1 of the pattern of 8. Dc in last st:
 Before moving on to the next row, count your stitches to make sure you have the same amount as when you started the blanket.
row 13
In new color, hdc in each st across:
row 14
ch 3 and turn with new color, dc across.
row 15
This row begins the star stitch pattern. I’d recommend choosing a lighter color so that the stitches really show up! Each time we make the star stitch pattern, the first row of it needs to be on the right side of our work.
ch 3 and turn with new color:

Now we’re going to work into the chains we just made. In the middle of the 3 chains, insert your hook and pull a loop through. Then in the bottom chain, insert your hook and pull another loop through. It’ll look like this:
Now insert your hook through the last st of the previous row (or 1st st of this row) and pull up a loop. Pull up loops through stitches 2 and 3 as well:

You should have 6 loops on your hook. Yarn over and draw through all 6. Ch 1 to close the stitch and form the “eye” of the first star:
Insert hook into the “eye” and draw up a loop. Insert hook around the last “spoke” of the previous star and draw up a loop:
Pull up a loop from stitch 3 of the bottom row, where we pulled up the last loop of the previous star. Pull up loops from stitches 4 and 5 as well:
Yarn over and draw through all 6 loops, ch1 to close the star and form the “eye.” Continue in this same way (pulling up loops through the eye, around the last spoke of previous star, in the same st as the last spoke of the previous star, and in the next 2 stitches, and then chaining 1 to close the star) until the end.
At the end, you should have 1 stitch left. Make a hdc in it and keep the same color going:

Here’s what the back of your work should look like:
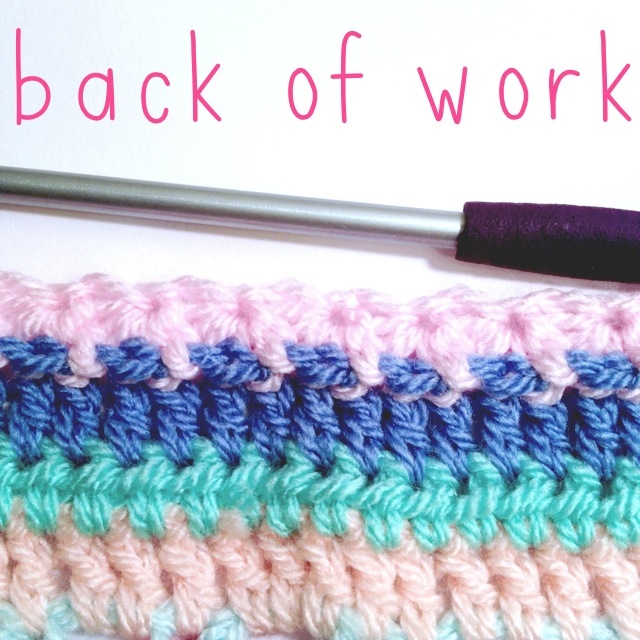
This is why the blanket has a front and a back to it. Next, ch 2 and turn.
row 16

Make 1 hdc in the “eye” of the last star of the bottom row:

In the next eye and all the rest to follow, make 2 hdc stitches:
At the end of the row, make 1 hdc into the top turning chain you made in the row below, but don’t finish it because we’re done with the star stitch and we’ll change colors now:

Here’s what the front of your blanket should look like after the star stitch rows are done:

Ch 3 with new color and turn.
row 17
This row is a regular dc row except we’re going to make our stitches in between the hdcs of the previous row. This is so there won’t be a ridge/line between the top of the star pattern and our new row (if you crochet across like normal you’ll see what I mean). I’m crocheting over my yarn tails here so I don’t have to weave them in later. Here’s what the first few stitches look like:

Keep crocheting into the spaces between the stitches of the previous row until the end. Since crocheting into the spaces shifted us over slightly, we’ll have to make what seems like an extra stitch at the end:

If you count, however (which you really should do now), you should have the same number of stitches as your very first row of the blanket.
row 18
With new color, dc across.
rows 19 – 21:
With 2 new colors (or 3 if you prefer), make another section of granny stripes. When we do granny stripes we also want the first row to be on the right side, and we must do an odd number of granny stripes or we won’t have the same number of stitches across (weird, I know, but the even granny stripe rows just don’t have the same number of stitches).

row 22
With new color, dc across.
row 23
With new color, hdc across.
row 24
With new color, dc across.
row 25
With new color, hdc across.
row 26
We’re going to do 3 rows of 1 color, so I’d recommend starting this row with a color of yarn you have a lot of. With your chosen new color, dc across. I’m using my lavender color for this:

row 27
Do not change colors. This is a row of hdc with bobbles interspaced. You can space your bobbles however you like, but I’m personally putting 9 hdc stitches in between each bobble. The bobbles will be a different color, so pick one that goes with your current working yarn. If you want to space your bobbles like mine, here’s what to do.
ch 2, hdc 8 across. Leave last stitch unfinished:

Finish the stitch with your bobble color. Crocheting over the working yarn of your background color, make 1 dc in next st, but do not pull the last loop through:
Make 3 more unfinished dc stitches in the same stitch. You will have 5 loops on your hook:

Switch to your background color and pull it through all 5 loops of your bobble stitch. Make a hdc in the next stitch:

Working over your bobble yarn, make 8 more hdcs, leaving the last unfinished. Repeat the bobble. Keep doing this until the end! You will not have 9 stitches of background color at the end (I have 7) but that’s OK — it looks fine, right?
row 28
With the same background color, dc across. That completes the bobble section! Aren’t they cute?

row 29
With new color, hdc across:

row 30
With new color, dc across
row 31
For this row and the 3 following rows, the turning chains do NOT count as the first stitch as they have previously been doing.
Change to a color you have a lot of. Ch 1. In the first stitch, bring up a loop. Bring up a loop in the second stitch as well:
Yarn over and draw through all 3 loops on hook:

That counts as our first stitch. It’s essentially my way of making sc decreases without just skipping a stitch entirely, as some books and patterns recommend. In the next st, make a hdc. In the next st, make a dc. In the next st, make 3 tr. In the next st, make 1 dc. In the next st, make 1 hdc:

We’ve made a “mountain!” Now it’s time to decrease again, only this time we’re going to pull up loops from the next 3 stitches, not 2; yarn over and pull through to finish the st:
In next st, make a hdc (the start of another “mountain”)… Continue this way, making the mountains and decreasing, until the end. It should look like this:

At the end of the row, you should just have 2 stitches left to work into for your last decrease instead of 3. We’ll do the same as we did in the beginning and pull up loops from the 2 stitches, preparing the decrease:
row 32
With your next color, finish the decrease of row 31. Ch 1 (again, this does NOT count as your first stitch like it usually does). This row is the same process as row 31 only we’re just using sc. Pull up loops from the first 2 sts:

Yarn over and finish the stitch:
Sc in next 2 sts, then sc 3 in the middle treble of the row below:
Sc in next 2 sts, then make another decrease over the next 3 sts, just like we did in the last row:

Continue this until the end. It should look like this:
At the end, you will only have 2 sts, left, so do like we did in the last row: pull up loops from last 2 sts, yo, pull through to finish st. Yes, go ahead and finish the stitch. We’re not changing colors yet!
row 33
With the same color, repeat row 32, but do not finish the last decrease stitch because we will change colors now:

row 34
With the same color as row 31, ch 3. This does not count as your first stitch! Make a tr into the second st. That counts as your first stitch. dc in the next st, hdc in the next one:

sc 3 in next st, hdc in next st, dc in next st:

Now we’re going to decrease over the next 3 stitches. Make a treble into each of the 3 stitches but do not pull the last loop through any of them. When you’ve done that, yarn over and pull through all loops on your hook and it’s a treble decrease:

You’ve got it now; continue until the end. It will look like this:

At the end, there are only 2 sts left so we will just decrease with 2 unfinished trebles. Do not finish, we’re changing colors:

row 35
This is a normal row of hdc, so ch 2. This does count as your first stitch again, so make your first hdc in the top of the dc in the row below:

At the end, remember that the ch 3 of the row below didn’t count as a stitch, so make your last hdc in the top of the treble (but don’t finish, we’ll change colors):

I’d check to make sure you have the correct stitch count at this point. Should be the same number you started the blanket with.
row 36
Make a normal dc row.
row 37
Make a normal hdc row.

row 38
With new color, dc across.
rows 39 – 41
With new colors, work these three rows in the granny stripe pattern.
row 42
With new color, dc across.
row 43
With new color, hdc across.
row 44
With new color, dc across. Here’s a picture of the back of the blanket (don’t know why I didn’t get the front):

rows 45 and 46
Make sure row 45 is a right side row. Do the star stitch the same way you did it before:

row 47
With new color, hdc across. Remember to crochet between the stitches below like we did above the star stitch last time. Count your stitches at the end, just to be safe.
row 48
With new color, dc across.
rows 49 – 52
With 2 colors, do the Catharine wheel stitch pattern. And don’t forget to keep your stitches very loose! Someone suggested going up a hook size or two for these rows, so you could try that if it’d make you more comfortable.
row 53
With new color, dc across the same way we did after the last Catharine wheels. Count your stitches when you’re done.
row 54
With new color, dc across:

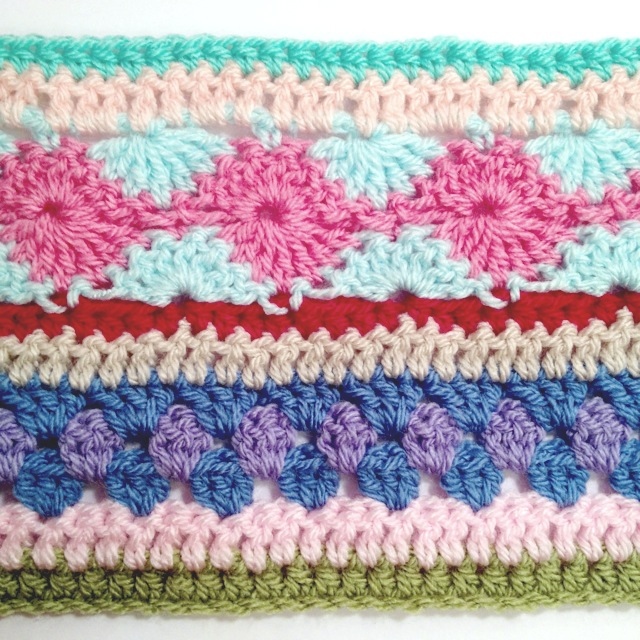
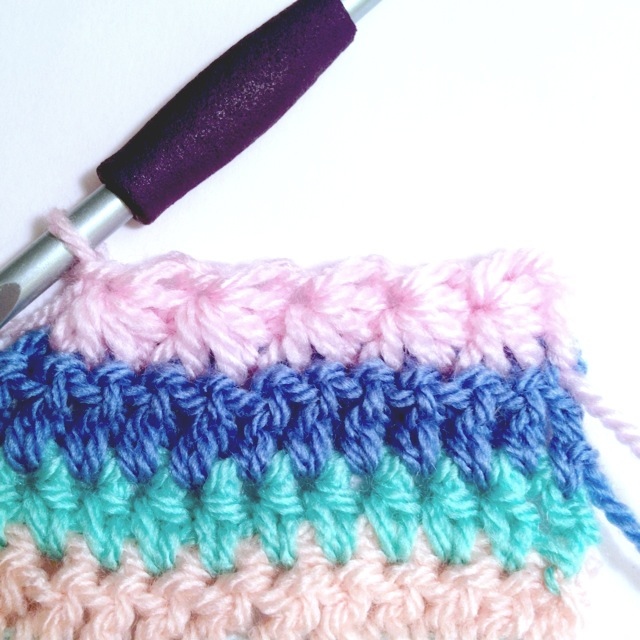
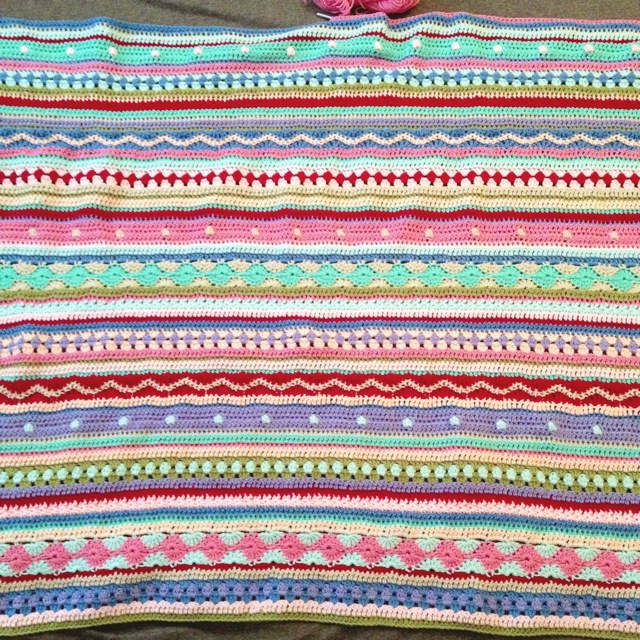
Here’s the whole thing so far:

row 55
With new color, hdc across.
rows 56-58
Using another color that you have a lot of, repeat the three rows of the bobble pattern.
row 59
With new color, hdc across.
row 60
With new color, dc across.
row 61
With new color, hdc across.
row 62
With new color, dc across.
Here’s all of these rows in a close-up:

And here is the whole blanket:

row 63
With new color, hdc across.
row 64
With new color, dc across.
rows 65-67
Another set of granny stripe rows! Click here for the original detailed pattern. Here it is so far:

row 68
With new color, dc across.
row 69
With new color, hdc across.
row 70
With new color, dc across. Here’s the past few rows:

rows 71-74
Repeat the mirrored chevron pattern. Click here for the original instructions. Here’s all 4 rows:

row 75
With new color, hdc across.
row 76
With new color, dc across.
row 77
With new color, hdc across.
row 78
With new color, dc across. Here’s what it’ll look like:

rows 79 & 80
With new color, work the two rows that make up the star stitch pattern.
row 81
With new color, work hdcs in the spaces between the hdcs of row 80. Check your stitch count at the end if you think you might be off one or two stitches.
row 82
With new color, dc across.
rows 83-85
With new colors, work the granny stripe pattern.
row 86
With new color, dc across.
Here’s what these 8 rows should look like:

row 87
With new color, hdc across.
rows 88-90
For these 3 rows, do the bobble stitch rows. Here’s a pic so far:

row 91
With new color, hdc across.
row 92
With new color, dc across.
row 93
With new color, hdc across.
row 94
With new color, dc across. Here’s a pic:

You get a bit of a spoiler if you can make out the top row.
row 95
With new color, hdc across.
rows 96-99
With 2 new colors, work the Catharine wheel pattern. Here’s a picture so far:

row 100
With new color, dc across as instructed in the original Catharine wheel instructions. You might want to count your stitches here, just to be safe.
row 101
With new color, hdc across.
row 102
With new color, dc across. Here’s the past few rows:

row 103-104
With new color, work the star stitch pattern.
row 105
With new color, hdc across.
row 106
With new color, dc across.
row 107-109
With new colors, work the granny stripe pattern.
row 110
With new color, dc across (sorry about the color quality of this picture):

And here’s a picture of the whole thing:

row 111
With new color, hdc across.
row 112
With new color, dc across.
rows 113-116
Work the chevron pattern. Here is a closeup of the past few rows:


row 117
With new color, hdc across.
row 118
With new color, dc across.
row 119
With new color, hdc across.
rows 120-122
With 2 colors, repeat the bobble rows.
row 123
With new color, hdc across.
row 124
With new color, dc across. Here’s a picture of the past few rows:

row 125
With new color, hdc across.
row 126
With new color, dc across.
rows 127-129
With new colors, work the granny stripe pattern.
row 130
With new color, dc across.
row 131
With new color, hdc across. Fasten off (if you are done with your blanket) and weave in your ends!

Ta-da!

notes for those who wish to continue with their blankets
1. Be conscious of your right and wrong sides as you continue.
2. The way I chose the order of the stitch patterns was pretty random except for the bobble rows. I tried to evenly space the bobble rows from each other, hoping that evenly spaced big bands of color would tie the whole thing together nicely.
3. If you would like to follow a specific pattern, I’d recommend going back, working row 8, and continuing from there. That would be the first Catharine wheel row. That should keep the bobble rows evenly spaced and will also keep your right and wrong sides correct.
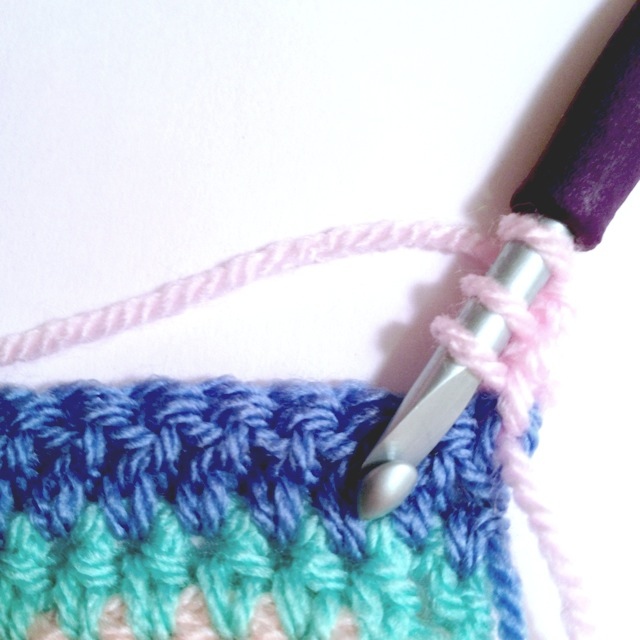
If you do make a different border, I would recommend that your first row around your blanket be a sc row because that will help give your edges some stability. Here’s a picture of my completed border:

It’s a pretty simple (but sturdy) sc border with a cute picot edging. Here’s how I did it:
border row 1
Connect your chosen border color to the bottom left corner of your blanket. Make 1 sc in each chain loop:

When you reach your corner, make sure you add at least 1 sc so that the corner will turn properly:

When crocheting up/down the sides of your blanket, spacing the stitches can be difficult. I recommend firstly that you crochet around the entire stitch at the end of each row; it’s much easier than trying to slip your hook into the middle of each and every stitch. When you come across a row ending/beginning in a sc, make 1 border sc around it. When it’s a hdc, make 2 border sc around that stitch. When it’s a dc, also make 2. When it’s a treble, make 3 stitches around the treble stitch. Some people prefer to do just 1 stitch around the hdc stitches, but you can experiment and see what works best for you (some people find that just using 1 stitch can make the border too tight or that 2 can make it too loose, depending on the gauge etc.). In the case of the star stitch, I placed 3 sc on top of it:

When you reach the beginning of your border, slip stitch to close the round, ch1, and begin row 2.
border row 2
Work sc stitches into every stitch of your first border row, remembering to put in extra at the corners. Close the round and begin row 3 the same way.
border row 3
Work 6 sc stitches. Here’s where we make the first picot. Start by chaining 3:
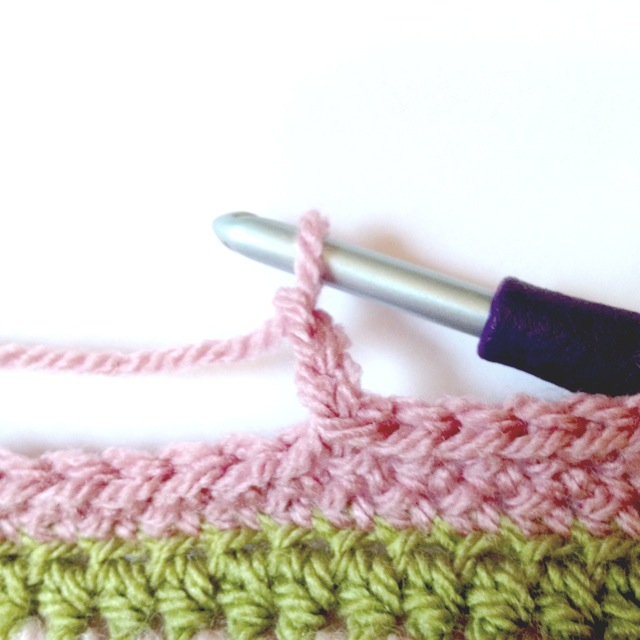
Slip your hook into the first of the 3 chains:

Yarn over and pull through the 2 loops:

Without skipping any stitches, make 6 more sc stitches in the row below. Make another picot. Continue making picots every 6 stitches until you come to the end. Tie off and weave in your ends, and you’re done:
blocking
If the edges of your blanket are too uneven for your taste, feel free to wash and block your blanket according to your particular yarn label. I myself did not do this with my blanket.
At this point my blanket is so large that I couldn’t get a good photo square on, but you can see all of the rows there.

And folded up:
a request
I would like to arrange a permanent page on this blog as a photo gallery with pictures of everyone’s finished blankets. When you are completely finished, I’d be so grateful if you could take a lovely picture and e-mail it to me at the photo’s full size. Also, in the email please let me know if you would like for your name to appear with your picture, and what name I should use. Here is the email address you can use: davish14 AT winthrop DOT edu
credit
Let’s remember our inspiration! The lovely blanket that inspired me was made by Julie at Little Woolie, and I must say that I’m a bit embarrassed that my blanket came out so close to hers; despite some efforts I made at the beginning to make them different, they do look so alike, particularly at first glance. I’m much relieved to say that she is OK with it all, because I did have some pangs of guilt there at the end. However I’m very happy with my blanket and I really do mean this as a credit to Julie’s lovely work — she is an inspiration in many ways! If you wish to pin her picture on Pinterest, please go here and do it from her page so that she can get the credit that she deserves. I’ll appreciate it, and she will too!


Beautiful! And I love your directions! Very well written and really helpful photo’s of the process. Thank you!
LikeLike
Wow thank you! Having spent months and months beavering away at my own “little Woolie” inspired blanket, I’m so thrilled to have found your very clear tutorial.. As a beginner crochet’er I’ve made a lot of it up as I go along so I’m very glad to have something a bit more concrete to follow for the last 50 cm!
LikeLike
Thank you so much for a wonderful pattern. I had such fun choosing colours and seeing the stitch patterns and colours come together. I used Vinnis Nikkim 100% cotton in a double knit. I worked a total of 200 rows by repeating the bands of stitches.
I live in Port Elizabeth, South Africa.
LikeLike
Thank you for posting this and your great explanation of all the stitches and pictures. You did a great job. I will definately be trying this.
LikeLike
Thank you, I hope you enjoy it!
LikeLike
Hi Hannah, I love the blanket!, I was wondering how many yarn of each color did you use? I am going to buy the yarns. Thank you!
LikeLike
WONDERFUL directions! Thank you! One question though…..how many different colors did you use in your blanket? Okay, I lied. One more question. What brand of yarn did you use and how many skeins of each color? I’m always paranoid that I won’t buy enough and knowing what brand will help me with figuring how many yards I’ll need. 😉
LikeLike
I used 10 skeins of Stylecraft Special DK plus one more for the border. So 11 skeins, 11 colors. 🙂
LikeLike
Thank you!!! 😀
LikeLike
Hannah, I just found this site and I love this blanket. I want to make one in the same colors you used. Could you please post the names of the colors. I would greatly appreciate it. I plan to check in on your site from time to time and use the patterns you post. You are wonderfully creative.
LikeLike
Sure! I used Parchment, Meadow, Fondant, Sherbet, Aspen, Apricot, Candyfloss, Lavender, Aster, and Pale Rose for the border. I hope you enjoy it!
LikeLike
Thank you for putting directions all on one page 🙂 I started my own stripey blanket before I found yours online so now I have more inspiration for my rows up to this point I’ve just been making mine up as I go but I like what you’ve done too.
LikeLiked by 1 person
Just love this afghan; turned on to it by a friend at knit shop retreat last weekend. I would like to ask if there is any special rule to follow in regards to number of colors and choosing their sequence. It would seem that the sky is the limit but, I am a bit OCD when it comes to doing things the “best” way. Open to suggestions.
Thanks, Lori
LikeLike
hi, love your blog. do you happen to have the pit bull sweater and scarf instructions somewhere? I have to make that for my niece’s pit bull Millie! thanks so much! am going to do the afghan during winter break. will post a photo when its done.
LikeLike
I’m afraid I don’t. I believe I just made them up but didn’t write them down. It was very trial and error — I kept having to try the sweater on her as I worked. The scarf was just a short and skinny scarf using dc stitches. I’m sorry I’m not of more help. I can’t wait to see your afghan though!
LikeLike
lovely!
LikeLike
These are directions even I can follow. Thank you!
LikeLike
Any chance you have these directions without the pictures? I wanted to print them out and it 95 pages with the pictures, then I need to edit all the colons out (that you use when saying it looks like this, or whatever) and put periods in. It would be a lot easier to do the pattern for those of us who don’t need the pictures.
Thanks.
LikeLike
I’m afraid I don’t — I don’t have any copy of the directions other than what’s on the site. I can certainly make a copy of the directions without the pictures but it would probably be a while. I just moved to another city and I have a lot going on, plus the giveaway I just started. If you’d like to wait, let me know and I will put it on my to-do list!
LikeLike
try the cleanprint extension-it lets you remove pictures, comments, etc, so you get only what you want to get. It is an extension that gets added to your toolbar. I use it all the time, if I didn’t all my patterns, recipes, etc would be volumes long. You can also shrink the text to fit it on fewer pages. It tells you at the top how many pages it is so you can continue removing til you have what you need.
LikeLike
I lost 3 whole stitches after completing the first star row! How many stars should there be? This is the hardest project I have ever worked on….I keep having to adjust, because of my stitch count getting screwed up. Any suggestions going forward so I am not continuing to jury rig my stitches. I am so frustrated! 😦
LikeLike
Hmm… Well I can’t tell you how many stars you should have because I don’t know if your blanket is the same number of stitches wide as mine. However, as you continue on, I suggest using removable stitch markers. Try placing one every 20 stitches or so, and then you can more easily check your count. I’m not sure it will work with the Catharine wheels, and I know that the second row of granny stripe is not the same number of stitches (but it’s supposed to be that way). Hopefully that will help!
LikeLike
I forgot about that, the size of the blanket being different than yours. Your instructions are fantastic, which make it all the more frustrating that I am still making mistakes. That Catherine’s Wheel was a bear. I pulled the whole thing out three times! I went and got some stitch markers, hopefully that will help from here. Thanks!
LikeLike
Hi love this blanket and the colours. Don’t suppose you kept note of the colours you used and how many balls of each colour? Id like to order the wool! X
LikeLike
Sure! The list of yarn is here (with photos): http://wp.me/p1DWME-AG And I ordered more yarn than I used — I used 10 full skeins of DK yarn (1 of each color; each skein was 295m and 100g) for the body of the blanket, and I used about half of a skein of a different color for the border of the blanket. It was cutting it close on a couple of colors, so I’d suggest that if you want to make a blanket bigger than a throw size, you might want to order two of each body color. Hope that helps!
LikeLike
thanks for the really clear instructions and the pictures are so essential! Loving it – I AM only on row 24 though 🙂
LikeLike
I’m glad you’re enjoying it so far! When you’re done we’d love to see pictures over on the facebook page, or you can e-mail me and I’ll put it up in the gallery of completed blankets from around the world!
LikeLike
I have followed along this year as you created this masterpiece 🙂 I included a link in my most recent round up 🙂 Thank you for such a fabulous design and tutorial – I plan on making this one myself as soon as I can find time! All the best, Rhondda I’ve included it in this post: Free Pattern Friday – Let’s Get Warm! Crochet Blanket Pattern Round Up! Here’s the link: http://oombawka.blogspot.ca/2013/12/free-pattern-friday-lets-get-warm.html
LikeLike
I’m glad you like it, and thank you very much for sharing it with your readers! Your post has some really gorgeous blankets!
LikeLike
Wow, wow, wow I absolutely adore your blanket. This is one of the nicest blankets I have ever seen. Thanking you for all your photos and instructions, I would love to have a go, I have found my dream blanket!!! DEFINATELY , not your average crochet. Gez xx
LikeLike
Looks like I’m 4 years behind in starting this. Im using 8 ply pure wool and 5.00 hook. Not sure if this is right but it seems to be coming together ok.
Thanks for the inspiration.
LikeLike
Thanks for sharing this pattern! I love it already and can’t wait to get started! Going to pick up some yarn tonight– 11 different colors! I’m making it for my daughter 🙂
LikeLike
That’s great! I hope you share pictures when you’re finished!
LikeLike
This is beautiful and ThAnKyOu so much for sharing!! I will definitely be doing this blanket- double bed size- thought I’d start with 200+ chains. Love your blog and FB page. Will be following! Karen@MixTure43 :o)xx
LikeLike
So looking forward to trying this. Have found you through instagram #crochetalong2014 ! I am @patchworkrainbow thank you for posting this whole pattern so concisely.
LikeLike
Thank you so much for the pattern, instruction and Picture…..very good 🙂
LikeLike
Thank you! I’m glad you enjoyed it!
LikeLike
Beautifull blanket!!! do you know if somebody translated this pattern into dutch??? I can read and understand what your are writing, a friend of my can’t.
LikeLike
Actually, yes! A large group of crocheters are currently following the Dutch version of this crochet along: http://terraysleven.blogspot.nl/ hope you enjoy!
LikeLike
Thank you for this beautiful pattern. Do you know if there is a translated version in Dutch??? My friend wants to make this blanket to, but her English is not good.
LikeLike
Hi Hannah,
I love this blanket ,and I make this in the new pink colors. Is it possible to translate this free pattern in dutch, if you agree ,I want to give it for free on my crochet website , hakeninstijl.nl ( the site is not ready yet) i will translate it for you hooked in style.
Gretings from Francis Holland
LikeLike
Thank you! You can if you like, but it is already being translated into Dutch here: http://terraysleven.blogspot.nl/ I don’t mind if there are two Dutch translations, so it’s up to you.
LikeLike
hi im confused over the amount of skeins to use as you have said in an earlier post eleven but only listed ten colours and I really want this as my next project xx
LikeLike
You’re right! I’m so sorry — I forgot the shade called Lipstick! Thanks for pointing that out. It should be fixed in the pattern now.
LikeLike
thank you =) um also I was wondering could a beginner do this quilt ive never crocheted before but after seeing this quilt I really want to give it a try
LikeLike
I would practice by making a plain square first and learning the basic stitches (chain, single crochet, half double crochet, and double crochet). After you get those down you should be good!
LikeLike
Hello! I’m a crochet and loom knitting addict! Haha!
Thank you so much!! I have been looking for a pattern just like this in order to push my own boundaries to learn more crochet stitches! This is perfect! Again, Thank you!
Mary Ann
LikeLike
I hope you enjoy it! Feel free to post a picture on the Facebook page when you’re done — I’d love to see!
LikeLike
I like this pattern but, I had chained 194, and followed the instructions. But by the end of row 3, I was short 1 stitch at the end. I don’t know where I messed up.
LikeLike
I’m not sure without seeing it. The middle row of the granny stripe isn’t supposed to have the same number as the rest of the rows, but you’re talking about the first row of it so I’m not sure. I’d just add a stitch at the end of a row though instead of starting over.
LikeLike
I’m busy with two versions (small one’s 😉 ) of your blanket, buth can you tell me how long or high is the originel pattern? For the time I will maybe have the courage to make a big one like you did! 🙂
LikeLike
Mine’s about 50″ square, so it’s a throw size blanket. I hope you’re enjoying it!
LikeLike
I’m enjoying it very much (sorry my english is not so good 😉 ) it’s really the most beautiful blanket I ever saw!!!! Thank you for your answer!
LikeLike
Hello. Can you tell me what size your completed throw is? I want to make a small version as a baby blanket so could work out my stitch numbers by comparing it to yours. Thank you
LikeLike
Mine is about 50″ square. Hope that helps!
LikeLike
Hi Hannah, I’m wanting to do this gorgeous blanket. I only, so far, have 7 different colours picked out so only 700g of wool. Did you use all of the 900g you stated in the pattern? What would the dimensions be if I made one the same size as yours? Around single bed size? Thanks for your help
Lou 🙂
LikeLike
Yes I used almost all of it! My blanket is about 50″ square. Hope that helps!
LikeLike
Yes that’s great. Thanks. Ohh as if I needed an excuse to buy more wool lol 😀
LikeLike
Thank you so much for this pattern. I’ve got lots of odd balls of yarn that were crying out to be used up and this is exactly where they’ll go. I quite like the idea of so many different stitches as well … will keep me on my toes. It’s a fabulous pattern and I’m thrilled to have found it (and you). 🙂
LikeLike
Thank you very much! I hope you enjoy it and if you have any questions or comments feel free to let me know!
LikeLike
Love this blanket! Am making it right now! One little thing though: when doing the star stitch, you start talking about a front and back of the blanket (and I clearly see what you mean), however when continuing the pattern as described and doing the bobble row, I have my bobbles coming out in the back of the blanket. Did I miss something or is this normal?
LikeLike
Hmm… you should be able to push the bobbles through to the front — I had to do that with some of my bobbles, too. 🙂
LikeLike
I have the same thing happening with the bobbled. I am able to push them thru, but they pop right back to the “back” side. Do you think if I added another hdc row the bobble would pop out on the “front”?
LikeLike
Yes, and I think that’s a good idea! That should solve the problem. 🙂
LikeLike
Thank you so much for kindly sharing this pattern, it’s so detailed and easy to follow! Am making a doll version 😉 to see if I could do it, and I can.
LikeLike
hi I really love youre blanket but could you tell me wat the length and width of youre blanket is wit the amount of wool you used because we aint working with inches in Holland an I cant seem to figure out how it turn out hahah
greetings danielle
LikeLike
Hi! I’ve just finished making as-we-go-stripey blanket. Thank you so much for the excellent instructions and the inspiration to make this blanket. I love it so much I’m going to make another one and now that my crochet technique has improved – I’m going to be brave and mix it up a bit!
LikeLike
That’s great! I’m glad you enjoyed it so much! 🙂
LikeLike
I am having fun making this blanket for my soon to be born baby but have a question that I should have asked a while ago. When you say to do an hdc or dc but don’t tell us to chain at the end of the row are you expecting us to do one chain or none? I haven’t been chaining unless you tell us to & a couple rows looks a bit pulled tight at the end if that makes sense. Thanks for the lovely pattern!
LikeLike
When it says to do a hdc row or dc row, you should chain for them. Sorry for the confusion!
LikeLike
Thank you soo much for posting this pattern! Started off with a chain that was too long so it’s taking me longer than planned. I couldn’t bear undoing stitches in the beginning so my finished blanket is going to be huge! Lots of fun though and you’ve shown me loads of new stitches
Row 59 and counting, thanks 🙂
LikeLike
I’m really glad you’re enjoying it! Thanks!
LikeLike
Hi, this pattern looks really great, I can’t wait to start, I was just wondering how big your finished blanket turned out?
Thanks! 🙂
LikeLike
Sure! It’s a little over 50 inches wide and long (it’s square). Hope that helps!
LikeLike
Suggestions for making a larger one. Ie 60ish by 80 ish
LikeLike
I was able to follow along, easy peasy. I don’t really understand how to read a pattern, but having the photos made it so much easier for me to understand. I wish all projects came this way, I made a baby blanket, 120 stitches across and only did up to row 70. It turned out beautiful. Thank you so much.
LikeLike
I’m glad it was easy to follow! That was my goal. If you want to send a picture for me to put in the gallery with your name feel free. Here’s my email: davish14 (AT) winthrop (DOT) edu
LikeLike
I’m officially HALFWAY DONE with this blanket and I have had so many people ask if i planned to sell it I’ve actually started limiting who can see my progress pics on Facebook! You’re totally awesome for writing this pattern out! I’m using “crazy colors” (bright blues/greens/pinks/yellows/etc) because that’s what I like, and it’s turning out AMAZING 🙂 Thanks for the pattern!
LikeLike
I’m glad you’re enjoying it so much and that everybody else loves it, too! It sounds really pretty with those colors!
LikeLike
I finished it!!!! and sent you pictures! I had (as I called them) wonky edges, so I improvised my border… i used a round of sc, then a round of scallop/fans (think the first row of the Wheel pattern if you will) in an different color, then back to sc in the first border color… it might be cheating, but after working so hard i wasn’t about to let those edges look like it wasn’t intentional! and by gosh, they look like i meant to do that now!
LikeLike
I’m glad it worked out for you! Thanks for sending the pictures, too — I love seeing them and I’ll put them up in the photo gallery soon!
LikeLike
Hi, I juft finished the first ‘bubble’ sequence, but the bubles seem to go on the wrong side of the blanket. Any ideas how this is possible? I think I’ll be able to fix this but it’s still weird. Many thanks in advance! Christoph (yes, a man doing crochet :-))
LikeLike
Mine actually did that a bit too, though I’m not sure why. I just poked them through to the proper side when it happened. Maybe I should have tried a different method of making them, but it was very spontaneous and I don’t think I even made a swatch. I hope it goes well!
LikeLike
Thanks for the fast reply! Next time I’m going to try to use more DC in the bubble. I love your pattern by the way. So much fun doing it! When I’m done I will send you a pic. But that won’t be any time soon because it’s 95 inches wide so it takes a half hour to do one row and it’s going to be a square so… 🙂 Love! x
LikeLike
Thank you! Your blanket sounds great, I look forward to seeing it! 🙂
LikeLike
Hello,
so wonderfull!!!! We will made this plaid as a “friendship plaid” :-).
Can you tell me how long the plaid is?
xoxoxo
Mimi
LikeLike
Hi Hannah – HELP!!! Just found your blanket and wonderful instructions on Pinterest. I began a similar blanket after seeing Julie’s online. I’ve been working on it for quite awhile and it’s almost finished now. I have a big problem that maybe you can help me with – waves. As a fairly new crocheter I didn’t think to count my stiches and as a result the lengths of my rows differ and my blanket tends to waver in and out. I have no desire to rip out about half the blanket but I do have and inch or so difference from the shortest to the widest rows. Do you have any idea if there is a border I can do that will camoflage this? Thanks so much
Miriam
LikeLike
I don’t blame you for not wanting to rip it back out! I’d do a basic row for the first border row to even it out — you can do sc in the areas that are widest and hdc or dc or even tr in the places that pull in. Then once you do that you can add a more complicated border or whatever you like. Does that help?
LikeLike
Thanks for the advice. The real problem is that because the sides change colors all the time I think it may still be noticeable but I’ll try and I’ll report back and let you know how it goes.
LikeLike
Due to me not counting each row of stitches, mine turned out a little more wavy on one end too. I thought about buying some blanket binding to sew all the way around this blanket so it would be nice and straight covering up those wavy ends. Since the yarn I used was all vintage I decided to just sc and hdc in the valleys, and I made two rows on each end of this blanket. I did not tuck the ends of the rows in. I just pulled them through the sc/hdc edging and added lots more fringe. It’s afghan size and I love how it turned out.
LikeLike
A very very thank you for your detailed tutorial! I can’t imagine how much time and efforts you have put in for every detailed steps and pictures, but I know that with every stitch u have done, your thoughts are to share this pattern with everyone. Thank you so much!
LikeLike
I am only a quarter through my throw and love the colors and different stitches. I do notice my edges are getting increasingly uneven and see that all the different stitches are causing this, especially the Catherine wheel! Even though I did it loosely it still pulled the row in and caused unevenness. I’m going to have to go around the whole edge a couple of times to make this look presentable, or maybe use some free form crochet to help it. It will be beautiful if I can straighten it.
LikeLike
Just the pattern I was looking for! Thank you so much for all the work you put into this!
LikeLike
Dear Hannah,
I am (almost) speechless : this is wonderfulissimo !!!!! I’ve been searching through the web for quite a while now to fine a blanket original enough to give me kind of impulse to start. This is the one ! Discovered two days ago, I started the job yesterday. Your directions are extremely helpful and precise enough to understand it all. I thank you VERY much for this and for sure I definitely send you a picture when I am finished.
Many thanks again !!!!
LikeLike
Thank you so much for sharing! I am currently making one and having a little trouble with the star row. At the end of the first stripe of the star, do I close the “eye” before the hdc in the last stitch? Thanks in advance for your answer.
LikeLike
Yes, go ahead and close the eye. In the next row you’ll be crocheting into it almost first thing! 🙂
LikeLike
Hello Hannah,
thank you so much for this pattern! I saw the blanket on the internet on another blog I’m following quite a while ago but never realised there actually is a free pattern on another blog by someone who invented the pattern. I was only today I found your blog which is really lovely. And the pattern is even as a pdf so I can print it and read it easily on the train on my way to work (my most common crochet time)! Thank you so much.
I finished a ripple blanket last autumn and had only little projects to use up the rests ever since, so now I was searching for a new project and tadaa, here it is thanks to you. I’ll send you a photo once I’m finished (although this might take a while).
Regards from Germany!
Doris
LikeLike
I’m glad you like it, and I look forward to seeing your finished blanket! I hope you enjoy making it!
LikeLike
I’ve loved crocheting the blanket from this pattern. Thank you for sharing it. I still have the border to add but am happy with the 172 rows I have completed. Your picture instructions are wonderfully clear and a great help. I especially love the look of the Catherine wheel pattern although I am concerned some of the single threads in this part may snap with use.
LikeLike
Can someone tell me if the 9 balls of yarn under materials means 9 balls of each color? Because there are actually 10 colors? TIA for your prompt reply.
LikeLike
You only need 1 ball of each color for a throw size, but 2 if you want to make a larger blanket that would fit a bed. Hope that helps!
LikeLike
That answers it. Thx!
LikeLike
I’m having so much fun with this pattern!! Look forward to getting home from work to work on it!! Thank you for sharing this… Will post photos when I am done and just posted day 1 on Facebook!!
LikeLike
That’s a truly beautiful blanket. Love the colours you’ve chosen and so much work in the instructions – thank you so much. I’ve got a blanket-on-the-go along the same lines but much smaller – lap size for chilly toes on winter evenings! With any luck I might finish it sometime this year – no rush! Well done – it’s a work of art – and thank you for popping over to my blog! Always welcome for a chat!
LikeLike
Thank you very much! Can’t wait to see your blanket all done, but I agree that taking your time on things makes them more enjoyable. 🙂
LikeLike
Thank you so much for sharing and all of the great direction and photos.
LikeLike
Hi Hannah,
Two months ago I started with the CAL blanket from the dutch group, but I swited to your side as your pictures ar mor step by step. I am not good at crochet. Normally I sew clothes but I cannot concentrate now due to operations and so I started with this project. I am only at the first wheel and it cost me a lot of sweat and tears. Maybe you never see a whole blanket from me but you inspired me to the first steps thank you very much.
http://djaktief.files.wordpress.com/2014/06/p1130697_1.jpg?w=300&h=225
LikeLike
I’m sorry you’ve been struggling with the wheels! They are really tricky — it took me forever to figure out how to do them myself. But don’t worry — you can skip them and your blanket will turn out fine! I’m glad you’re giving crochet a try, and I hope you’ll enjoy the blanket more without the wheels! 🙂
LikeLike
I have a lot of crochet thread and I do not buy any new. I find it a challange to use all the rests to create something new usefull. It reminds me of all the other projects where these threads are the lefovers from. I like the rest I get from the croching and the memories and this motivates me to battle the wheel 😉
LikeLike
LOVE this!!! I am a beginner and the instructions are so easy to follow with the pictures!! I got through the star stitch (my favorite so far!) But the row of dc after the star stitch I’m short by like 30+ stitches… any idea what I did wrong? I started with the same amount of stitches that you did, and up until this point they’ve been correct with yours. Not sure if I did something wrong when I did the row of hdc on top of the stars? I’m going to pull it out and try again, maybe I missed something. All in all, excellent tutorial! Would love to see more like this! 🙂
LikeLike
Hmm… I’m not sure what’s going on there. If you want to take a picture and email it to me I’ll look and see. My email is davish14(AT)winthrop(DOT)edu
LikeLike
There is a large discrepancy on the edges of my blanket even after using a larger hook for the required stitches. I hope that the edging and blocking will help this. I am on row 40ish. I am using the same brand of yarn but obviously in different colors.
LikeLike
Yes washing and blocking should help a lot! It did for me.
LikeLike
Thank you so much, I have rarely seen such well written and easy to follow instructions! I can’t wait to go yarn shopping and make my own 🙂
LikeLike
Thanks I’m glad you like it! 🙂
LikeLike
Hi Hannah
I looove this pattern and can’t wait to crochet when I get home 🙂 I am just not sure about the Catharine wheel. I do crochet very loose and I used one size bigger hook, but it pulls inward (sorry my english is horrid) . Hope you understand what I mean, and that you can help me with a solution. Thank you for the great tutorial. xxx
LikeLike
I know exactly what you mean! The border at the end should help, and washing it and blocking it should help too. If you don’t think that will work you can just leave them out! 🙂
LikeLike
Thank you very much. To leave the wheels out is an option, but I don’t want to! 🙂
Hope you have a wonderful day. xxx
LikeLike
I love this blanket; I’m making it in a crib blanket size. I’ve gotten through the first sequence of stitches and have somehow added on about 10 more stitches than I began with. Here’s my question: should all the rows have the same number of stitches you began with? You said that the second row of the granny stripes shouldn’t, but what about the others? I don’t feel like ripping. I may just sneak in some decreases in a plain row and count from then on, blocking when I’m finished to even it all out. Thanks.
LikeLike
Most of the rows should indeed have the same number of stitches. The first row of the star stitch pattern will not, and I don’t think the Catherine wheels will, either. Hope that helps!
LikeLike
hi – thanks for the pattern – i’m stuck on the star stitch row – so i have an odd number of stitches as it says at the beginning – i have 97 – the pattern says you should have one stitch left at the end of star stitch row – i have 2 – so each star stitch uses 2 (new) stitches except the first one which uses 3 – that means that doing star stitch to the end will use an odd number of stitches and leave me with 2 at the end not 1 – i can’t see where i’m going wrong – can you help please – thanks
LikeLike
Hmm… I think I know what it might be. Go ahead and put another star stitch at the end to take up those last 2 sts. What I meant was that you should put a hdc where the last spoke of that additional star stitch is, does that make sense? Sorry for the confusion — I hope that helped! Let me know if you have any more questions!
LikeLike
oh thank you so much – this really had me baffled – thank you for the quick reply – going to try that row again now 😉 xx
LikeLike
Dear Hannah, Thank you so much for this pattern. I am a novice crocheter but the colors and variety drew me in- I think this is a PERFECT project for newbies. There are so many different stitches and I get to “practice” them two-three times throughout the pattern- I have already noticed a HUGE improvement in my crocheting skills from the beginning of the project to R84 (which I am on now). Before doing this blanket, I would have never tried a pattern that featured the “fancy” stitches (star stitch, bobble stitch, etc)- Previously, I had limited myself to single or double crochet or granny-style patterns. After I complete this blanket, I don’t believe I will have a fear of ANY stitch!! Thank you! Thank you! Thank you!
Andrea
P.S. I totally plan to do a second As-We-Go Blanket now that I have the hang of it!!
LikeLike
I’m so glad it’s helpful for you and that you’re enjoying it! Thanks for such a nice comment!
LikeLike
I am really enjoying making your blanket but I’ve got a bit stuck. Please could you explain row 33? You say ‘repeat row 32’ but what to I do at the top of thepeak? On row 32 you work 3 stitches into the one treble so on row 33 do you work into each of those stitches? Doesn’t that mean you end up with too many stitches?
LikeLike
I’m glad you’re enjoying it so far! I’m sorry for the confusion — on row 33 you should put your cluster of 3 stitches into the center stitch of the 3 stitches below. Does that make sense? Since you’ll also be decreasing as you did in row 32 your stitch count will remain the same. I hope that helps — if you have any more questions feel free to ask!
LikeLike
Thanks so much for replying, that makes perfect sense, I’m ploughing on full steam ahead and still loving the results 🙂
LikeLike
Hello! I am having a bit of trouble with the border. I commented earlier about how helpful the tutorial has been- especially with me being a fairly new crocheter. However, because I am a novice, many of the beginning stitches of each row are unsteady, messy, etc; therefore, I am having trouble with the border. Is there a tutorial that can help me with this? Is there a simpler way to do the border? I began the sc row but it was still looking wonky so I took that out. Should I continue, do the second row of sc then see how it is shaping up? Should I block it first, then work on the border? Help!! 😉 Thanks so much.
LikeLike
To make it easier on yourself I’d block it first. That should help. Also, once you get the second row of the border done it really helps stabilize everything. If you have any more questions let me know! Hope that helps!
LikeLike
I’m a total beginner to crochet but I already up to row 70 of this pattern. thank you so much for sharing it and for the great easy to follow steps. I couldn’t have done this without you. OMG I love crochet!
LikeLike
I’m so glad you’re enjoying it! Crochet is great!
LikeLike
Thank you so much for this beautiful tutorial! I am super excited to work on my blanket. I have one question…I am buying one ball of each color for a small blanket. Do I need to save one of the balls for the edging or did you use that color in your stripes also? I have 100gm of each color in DK weight and am going to make a stroller blanket. Thanks so much.
LikeLike
I saved one skein/color especially for the border. Hope you enjoy making your blanket, and Happy Holidays!
LikeLike
Wou, thank you so much for the pattern, picture with a clear instruction. The blanket is beautiful.
LikeLike
Thank you very much for the pattern. I’ve just raided my yarn drawer and will be starting to make one very soon 🙂
LikeLike
I absolutely love this pattern! Thank you so much for putting it all together so clearly. My question is how did you decide the color rotation? They seem to flow so nicely. no color is to close together. I know I will spend hours overthinking this. Or I will end up doing the colors in the same order over and over. I can’t wait to start 2015 with this new project!
LikeLike
Thank you! When choosing colors I made sure I had used every color once before repeating any, and then I tried to not run out of any one color by assigning the larger rows evenly to all of the colors, if that makes sense. 🙂
LikeLike
I love this pattern. Thank you for sharing. I’m getting ready to do my mood blanket and doing these stitches.
LikeLike
I’m glad you like it! I bet your mood blanket will be awesome!
LikeLike
enjoyed working on this blanket as you never get tired of working with one stitch or color could send pics if you like
LikeLike
I’m glad you enjoyed it! I’d love to see your blanket, feel free to email them to me at the email address provided on the pattern page or you can post them on the facebook page and show it to everyone!
LikeLike
Hello! I’m now making my 2nd stripey blanket with this pattern — what a beautiful blanket! I’ve loved the first one so much. Okay, so here’s my observation: I did the chain foundation just as you did: 192 + 2 = 193 total stitches. When I got to the end of row #12, I looked carefully at how you did the end of that row (the row just above the Cath Wheel, where you have to count your stitches again so carefully. When I copied exactly how you did the end of the row (mirroring your stitch pattern), I ended up with 194 stitches, so I had to reduce by one, removing one of the clump of 3 stitches just before the final DC that sits on the end. Not sure exactly why it turned out that way, but thought I’d let you know. I’m enjoying my 2nd foray into this fun pattern!
LikeLike
Hmm… I’m not sure why that would be. Thanks for letting me know — I’ll look back and see if anyone else has had the same problem. I hope you’re enjoying your second blanket!
LikeLike
What a truly fantastic blanket! Super detailed blog instructions, great photo’s too! Thanks for sharing…. I am now going to sort thru my yarn collection to see if I have enough to make a start, good excuse to buy more if I plan to make a biggie!
Best wishes, many thanks for your inspiration.
Jay, thesewingwren@wordpress.com
LikeLike
Thank you, I hope you enjoy making your blanket!
LikeLiked by 1 person
I love how this blanket looks…have ordered some yarns and can’t wait to embark on this new project!!!
LikeLike
Thanks, I hope you enjoy making it!
LikeLike
Hello, this is something incredibly extraordinary. OMG, beautiful work. Thank you. Have a nice day, Eva
LikeLike
FABULOUS! Thank you for being so detailed. One of my next projects, so glad to have someone like you online to help. Thank you for taking the time to share!
LikeLike
I’m glad you like it, and I hope you enjoy making it!
LikeLike
thank you so much for the great pictures and the clear pattern description!!!! 6 weeks work but Wow the result!!!!!
LikeLike
Greeting!
You made me literally cry! I am so appreciative of your hard work not only creating the most beautiful crochet blanket but writing down step by step instructions AND taking photos asking the way! You have a very kind & a generous heart. 🙂
I will attempt this project and will let yoy know how it goes. Thank you so much!
LikeLike
Sorry about the spellings. Meant “all” not asking. Meant you and not yoy.
LikeLike
I’m glad you like it so much! I hope you enjoy working on it!
LikeLike
Hi Hannah, my son wanted a bed spread and saw your blanket online, send me the link. I started 2 months ago finished last week, I don’t think I enjoyed working on a project this much ever, looks amazing and I am delighted with it, THANK YOU, such good instructions, found it easy to follow, after finishing all different rows I just did what I chose to do.Thank you again.
LikeLike
I’m so glad you enjoyed it! I hope your son loves it too! 🙂
LikeLike
Me encanta. Gracias.
Carmen
LikeLike
Great pattern and gorgeous afghan! I’m making one for my new little one due in July. I didn’t get time to read through all the comments, so I hope I’m not asking a duplicate question, but I’m having trouble with the star stitch rows pulling in, no matter how loosely I try to do them. Would it make sense to go up a hook size on those rows, as well? Or am I doing them wrong?
LikeLike
I’d say go ahead and try going up a hook size. If your stitch count is correct after the second row you’re doing them right!
LikeLike
Thanks!
LikeLike
Great directions for a gorgeous afghan, thank you so much! I’m making one for my new little one due in July, and my stepson is so jealous and wants one just like it. 🙂 One issue I’m having though… My star stitch rows are pulling in, no matter how I try to loosen them up. Is it a good idea to go up a hook size on these rows, too, or am I doing something wrong?
LikeLike
I have literally spent hours and hours on Pinterest trying to find something to make and I’m super excited to start this as a birthday present to myself this year! I saw that the estimated width was 50″ and I know everyone crochets with different tension, but I was just wondering how long your ended up being. (Not sure if you’ve answered it somewhere else so sorry if this is a repeat question.) Thanks!!
LikeLike
Mine actually stretched a good bit with regular rough use, so now mine’s close to 60″!
LikeLike
I just began making the blanket. I’m very pleased with your pattern. It’s easy to follow! I will post a picture when it’s done. I’m now at row 27……… 🙂
LikeLike
I’m glad you’re enjoying it and I look forward to seeing the finished product!
LikeLike
Is there just a typed version of this beautiful work? I’d like to print it off, but 125+ pages is too much. I don’t crochet well reading my phone and crocheting. I can print off a less printer intensive pattern.
Thank you for creating the pattern and sharing it.
All the best,
Marianne
LikeLike
Yes, there’s a PDF version without pictures, the link is in that first paragraph. Hope you enjoy!
LikeLike
You are wonderful! I love your blanket, and your very clear description and beautiful photographs – this must have been such a lot of work. Thank you so much for sharing this pattern. I am going to try this and it will be my first ever blanket. I never dared, and now I do, thanks to you! 😉
LikeLike
Thank you! I hope you enjoy making it and if you have any questions don’t hesitate to ask! 🙂
LikeLike
WOW!! what a beautiful blanket and a fantastic tutorial – thank you. It must have taken quite some time to wrtie this up. Your efforts are much appreciated and maybe one day I will get time to try this one x
LikeLike
Thank you so much! If you ever try it, let us know how it goes! 🙂
LikeLike
I just found you. What a wonderful blanket. Could you please tell me how many chains I would need to make this into a king size bedspread? Thank-you in advance.
LikeLike
I’m honestly not sure, you’ll have to experiment because it depends on your yarn, your hook size, and your tension. You’ll have to test it out by laying it across the bed, but as long as it’s a multiple of 24 plus 2 at the end, you should be good. Keep in mind the finished product will stretch a bit, as well. Hope that helps — sorry I couldn’t give you a specific number!
LikeLike
Bonjour , magnifique , merci pour le partage 🙂
LikeLike
Beautiful blanket…….love it. thank you for sharing.
LikeLike
Thank you, I’m glad you like it!
LikeLike
Thank you for this pattern, I’ve been looking for a stripy pattern but found they were made of mostly simple stitches. I find it funny I just finished learning the Catherine and star stitch. I think I’ll need a larger hook to do those 2 rows.
Thanks again, I can’t wait to put it on my list of blankets!
LikeLike
I’m glad you like it! I’d love to see when you’ve finished!
LikeLike
I would love to know how the stylecraft yarn holds up? I have never used it before. I would love to make this blAnket, but I don’t want to spend a fortune on yarn (at the same time I don’t want it to pill either).
LikeLike
Sure! I’ve had mine for a couple of years and it’s been heavily used by people and pets. The strength is still fine. It’s stretched some. It has pilled some and gotten a little fuzzy in places but not anything unreasonable considering the heavy use. Hope that helps!
LikeLike
Mine is in Stylecraft Special DK. It gets a lot of use- including my pup. I’ve washed it several times and it has held up very well. Good luck!
LikeLiked by 1 person
Arghhhh I have just had to frog all of mine, I ended up with too many stitches I was crocheting in the spaces not on each stitch I am used to just doing granny squares why am i such a thicko
LikeLike
Oh no I’m sorry Carmen! Some of the stitches can be tricky if you’re not used to doing them. If you ever try again feel free to contact me with pictures of problems or questions!
LikeLike
Ik was met een vierkant bezich. En kwam er naar een week of 28_achter dat het niet helemaal mijn ding was. Toen kwam ik hier terecht en had meteen het gevoel dit is wel wat voor mij . Vandaar dat ik maar ben begonnen met een rechte deken . als ik Vorder zal ik af en toe wat laten zien . groeten van mij
LikeLike
Please help I am on row 7 the catherine wheel I start of with 193 stitches so thats right but my catherine wheel always ends up at the end with no spare stitches, I have counted as well triple counted in fact, its driving me mad any help or ideas
Carmen
LikeLike
The last sc of that first Catherine wheel row will be made into the chain of the row below, not one of the hdcs. Does that help? Lemme know if that doesn’t solve the problem and maybe I can figure it out if you send some pictures. 🙂
LikeLike
This blanket is absolutely fantastic – love it.
I was just interested in the bobbles when I came to the page, but I saw such a lovely blanket to make. I purchased one ball of a lot of colours and more than one shade of each. I really intended them for a granny stitch blanket/afghan, I’m seriously considering this one.
I would even work out the entire length of this blanket (length ways and then work the second half as two pcs joined to the back) and I could have it over me to watch the tv or crocheting and wear it to answer the front dooror make tea. I didn’t look at your exact measurements, but I can work it out. This is well worth the find.
LikeLike
Thank you so much! If you do decide to make it I hope you enjoy both the process and the end result! 🙂
LikeLike
Just so beautiful! And amazing instructions. Thank you for sharing xx
LikeLike
Thank you, I’m so glad you like it!
LikeLike
Thank you so much for writing THE greatest directions ever! I am almost done with my blanket. I just have to get the border on. I will send a picture as soon as I can. I am so happy with how it turned out!
LikeLike
Thank you I’m so glad you’ve enjoyed it! Can’t wait to see!
LikeLike
I love your pattern. Im learning how to do a lot of new stitches and I got to row eight and did that one but my mind is not wrapping around the directions on how to do #9 row. I just cant get it. Any suggestions.
LikeLike
It’s kind of like an upside down version of row #8. Is there a specific part that’s causing you trouble?
LikeLike
I love your blanket and am so enjoying having a go at it. However, my stitch counts seem to be all over the place! In some of the rows you say, for example, to pull yarn through at the end then chain 3, but in others you simply say change colour do one row dc, change colour do one row of hdc etc. Should I always do a chain at the beginning of the rows even if you don’t mention it? Many thanks, Sarah
LikeLike
Yes, sorry for the confusion. If there’s a row that says do hdc all the way across, ch 2 at the beginning and count that as a stitch (or 3 for dc, 1 for sc).
LikeLike
I’m loving this. All the different stitches are so nice to learn, and so pretty whan done together.
LikeLike
Thank you! It was fun to make!
LikeLiked by 1 person
I’m doing Granny squares at the moment, using every different square I can find, and making up some of my own. I really should start putting them together soon, but will wait until it is much colder for that.
LikeLike
Once you start that it does get warm in your lap, doesn’t it? 🙂
LikeLike
Thank you! Thank you! Thank you!
LikeLike
I am making this blanket right now! I love how cheery and engaging it is.
I just finished row 10, the 3rd row of the Catherine Wheel part. Even though I went up to a J hook, and tried to make it loose, the Catherine wheel has pulled inward on the blanket and is making the work curve. Any ideas how to fix this, before I move on? I even added an extra ch to each cluster in row 9, but the whole thing is still pulling in hard.
Thank you for sharing this pattern 🙂
LikeLike
It was problematic for me too. It sort of fixed itself after some washing and using it for a while, but if you are hesitant feel free to leave those 4 rows out!
LikeLike
Thanks! I think I am going to continue and hope that with pressure from the next rows, and blocking, it works out. I am enjoying this blanket SO MUCH, thank you again for sharing it and for being so kind as to answer questions.
LikeLike
No problem, I’m glad you’re enjoying it!
LikeLike
I have another question- I am at the end of row 28, the bobble row. How do you tie off the bobble yarn? I don’t want to just leave it hanging, I don’t think it would stay put. Thanks!
LikeLike
I’d just go ahead and weave it in. Maybe thread the needle then go back into the row, going around part of the post of the last stitch so it catches the yarn and you’re not just unraveling what you’ve done.
LikeLike
Unfortunately just weaving it in would make it stand out like a sore thumb 😦
LikeLike
Is there a pdf of this afghan?
LikeLike
I found the pdf sorry.
LikeLike
This is such a beautiful blanket which I have just started. I am so happy that I came across it. I have done 134 stitches, it is straight at the ends but seems to be buckling in the middle. What have I done please? Am I totally useless at crocheting? Thank you.
LikeLike
Hmm, which types of stitches are causing the problem? It may just be a tension issue, but I don’t think you’re useless at crocheting! 🙂
LikeLike
love love this … I am currently on row 12. I am using different yarns colors for every row(except the ones that say use same color) and I am using some fuzzy type yarns as well,my granddaughter who turns 7 will love her new blanket.
LikeLike
That’s a really neat idea to play with textures! I hope you continue to enjoy making it and I’d love to see a photo when you’re done!
LikeLike
Hannah – the blanket is gorgeous! I love how you showed how to crochet each row step-by-step and even numbering the stitches. I’m attempting to crochet a small project and having these guides would help so much. I knit more than crochet so the tips are needed. Thanks for taking the time to show your process.
LikeLike
Thank you, I’m glad you like it and that the guides are useful to you! 🙂
LikeLiked by 1 person
Hello from Germany. Found your pattern and will make it in black, grey and white. Starting next time! Thank you for your great idea.
LikeLike
Hello! I hope you enjoy making your blanket! 🙂
LikeLike
Ok. I have Finished last night! May I send you a picture?
LikeLike
Of course! You can also post it on the Not Your Average Crochet Facebook page so everyone else can see, too, if you like! 🙂
LikeLike
Great explanation, thank you so much, beautiful colours! Kisses from Argentina
LikeLike
Hey I’m doing the blanket just now and loving it but somehow the section since the 2nd catherine wheel is far wider than the rest of the blanket. I’m still using the 5mm hook and still the exact same number of stitches yet somehow its wider. Any idea why? maybe my tension has gotten looser but do you think I’ll be able to block it at the end and that will fix it?
LikeLike
Hmm, if you’ve got the same number of stitches and are using the same hook as when you started then it must be a tension issue, but adding the border and blocking should certainly help (although I’m not sure if it’ll completely eliminate the problem). Hope this helps!
LikeLike
Beautiful! I have been crocheting off and on over the years. When I came across this blanket, I beleive it is the most beautiful chrocheted blanket I have ever seen. Thanks for the detailed instructions, but not sure if I can create one as lovely as the one you have displayed. I must ask, do you make blankets to sale, if so, how much?
LikeLike
Just wanted to say thanks so much for your catherine wheel tutorial – easiest I’ve found 🙂 Jan x
LikeLike
Thanks, I’m glad it worked well for you! 🙂
LikeLike
Love this pattern – will try it soon! Quick question…I always get confused with how to do color changes. Do you tie the new color in (with a knot) or do you just pull it through the last stich, turn and crochet over (no knots)? Hopefully that makes sense. I’ve been turning and crocheting over the ends (no knots), but find that the ends of the yarn end up sticking up through the stitches (a few inches in from the side). Not sure how to solve this problem. Thanks so much again and I can’t wait to get started!
LikeLike
Thanks! I usually crochet over the ends, too, unless there are gaps (like in the granny stripe rows), and then I sew the ends in. Hope that helps!
LikeLike
Love your pattern. When making the bobble row, the bobbles don’t seem to stick out as much as your picture shows. Any tips?
LikeLike
I’d add an extra stitch into them and then push them out a bit with my finger (since they sometimes go towards the back). Hope that helps!
LikeLike
What is your opinion of crocheting over the ends when making the border. I don’t like seeing the ends when I work over them on each end of my work. Thanks for still replying to questions. I love this blanket!
LikeLike
Thanks! I think it would be fine to crochet over the ends when making the border, although since the blanket changes colors so often it could potentially get bulky. If you keep the ends reasonably short though that shouldn’t be too much of a problem (although obviously not TOO short). Hope that helps! 🙂
LikeLike
Wow, I just was looking blog like yours? Great, great, great!
LikeLike
Your afghan/throw is stunning!! I have never crocheted or knit anything with so many color changes or stitches. I think it is high time I do!!
You have definitely inspired me with the eye catching beauty of your throw. I have a wedding coming up in April and I think this just may be the perfect gift.
Thank you so much for your wonderful pattern with not only text but also pictures!!
LikeLike
Thank you, I’m glad you like it and I hope you have lots of fun making it! 🙂
LikeLike
What a lovely blanket I wish to do one as it is very well explained!Beautiful!
LikeLike
Thanks, I hope you have fun making it! 🙂
LikeLike
Do u have it on ytube… I slow at ready
LikeLike
No, I’m sorry, I don’t have any videos on YouTube.
LikeLike
Wow! What an awesome, colourful smart design! I’ve just come across your site and I love everything I’ve already seen… I’m not sure I’ll crochet the whole blanket (too much work for me at the moment), but sure I’d pick some parts to make a couple of wall hangings… want to redecorate with things made by myself. May I,please? Besides, thank you so much for sharing such patterns for free…. (Is this a correct way to say it?).
Best
Angelica
LikeLike
You can certainly use my pattern, and I’d love to see your wall hangings! I’m glad you like it! 🙂
LikeLike
Of course, I´ll do it! Starting my work as soon as I decide the kind of yarn I’ll use, I have not made up my mind yet! 😉
LikeLike
What are your red, blue, and white yarns that are used? How many of each? LOVE the pattern!!! Thanks so much for sharing!
LikeLike
I’m MOST impressed, Hannah ! You’ve taken an enormous amount of trouble to give every scrap of input you can. What a good and clever person you are !!
LikeLike
Thank you so much! I hope you’ve found it helpful!
LikeLike
I have loved creating this blanket. It has given me further skills on my crocheting journey. If only all patterns were this helpful for us beginners. Thank you❤
LikeLike
I’m really glad that you enjoyed it and that it helped you. Thank you for taking the time to comment!
LikeLike
Can you do FDC instead of the chain 192 and the chain 2at the very beginning then HDC or DC?
LikeLike
I believe that would work!
LikeLike
Can anyone advise please – how much yarn does this blanket use please?
I have just completed a project using this yarn and have approx half of each ball left – will that be enough, or should I start with new balls?
Many thanks
Vicky
LikeLike
It depends on how many colors you have… but if it’s the same you’ll definitely need new yarn. I used all of what I had except for the border color.
LikeLike
This pattern is amazing , looking for months for a blanket that would be special and I have found it, thanks for spending so much time developing it. do you have other designs that you have created?
LikeLike
Thank you, I’m glad you like it! I haven’t designed any other blankets but I have other patterns available for free here: https://notyouraveragecrochet.com/patterns/ I hope you enjoy making the blanket! 🙂
LikeLike
I have just started my as you go stripe lake and it’s rippling already ..just got to second set otlf granny squares ..my stitch count is good ..how do I control this Thanks
LikeLike
The granny stripes? Hmm, the blanket is naturally somewhat uneven on the sides due to the different stitch patterns but is usually fixed by both the border at the end and blocking.
LikeLike
Hi from South Africa! Thanks for this happy colourful pattern! I am at the second cartwheel row. It seems like I am suppose to make a cluster of 8 if I am to crochet in every stitch? If I make a cluster of 7, there is still one stitch left before the top / middle stitch. Hope I make sense! 🙂 Can you please help?
LikeLike
Hi, I’m sorry that row is being problematic! It does make sense… Hmm, did you make sure the first row of the wheel had just 7 dc sts in each shell? That’s the only thing I can think of off hand without seeing it. If that’s not the problem, let me know and I’ll shoot you an email and you can send me a picture and we can figure it out. 🙂
LikeLike
Yes, the first row only has 7 stitches, but even though I had 8 loop in my cluster each time, somehow it worked out and looks fine. Thanks for the reply.
LikeLike
I started my blanket… I love how it’s coming out.. I can’t put it down. Thank you !
LikeLike
I’m glad you’re enjoying it! I’d love to see a picture when you’re done!
LikeLike
I started a ‘crochet as you go’ blanket. I came across your sight and followed a few of your rows. Thank you for your lovely directions. I found them easy to follow and this gave me the confidence to try a few of my own rows. Thank you again.
LikeLike
Thank you so much taking the time out to demonstrate all these wonderful stitches so easy to understand with all the pictures, being a novice I really appreciate this thank you for sharing
LikeLike
Thank you, I’m really glad it’s useful to you and easy to understand. That was my goal! 🙂
LikeLike
Hi Hannah… I just felt compelled to send a thank you so so soooooooooo much email to you… I’ve never sent an email before so I hope this goes through ha ha. I’m fairly new to crochet and have just taught myself from magazines, the internet and you tube. I came across your GORGEOUS blanket while flicking through looking for a blanket to make for my pregnant friend. I’ve just finished row 9 after going up a hook size as you suggested and I’m so proud of it so far. 😉 Thank you so much for the time and effort you have put into your page and sharing it. It must have taken you ages and I felt I needed to say thank you to you. I couldn’t have followed a pattern as tricky as this looks if it hadn’t been for your great instructions and photos. I made mine 120 stitches plus the 1 more stitch as said. You are truly gifted and I can’t wait to give my friend her baby blanket… she’s due in a month so I better get a move on ha ha. Not sure what row to finish on yet but I’m sure I’ll figure that out. Thank you again… Emma X
LikeLike
Emma, thank you so much for your kind words! I’m really glad you like the blanket and are enjoying making it, and I hope your friend likes it, too! Hehe, and I teach myself new stitches from YouTube, too. 🙂
LikeLike
I have wanted to venture out and make a more complicated blanket and now I can! I’m sure it will take me a long time but I love your detailed instructions and photos. Thank you for taking the time to do this!
Blessings,
Joyce
LikeLike
I hope you enjoy making it, and if you have any questions feel free to ask! 🙂
LikeLike
Thank you so much for all your hard work to get this pattern to us. Very good instructions and pics
LikeLike
Thank you, I’m glad you like it! 🙂
LikeLike
Finished this gorgeous piece, did it in tears and purples turned out beautiful and Boho ( which is my favorite) Thank you so much for the pattern
LikeLike
Hi, Hannah, I need your help! I can not do chevron stitch…. I finished the first mountain row, it seems it is right to me as I finished two stitch left and decreased. ( I have 193 stitches as you do). But I can not follow your second row of chevron stitch.. I don’t have enough stitches. The beginning of row 32 (the first mountain) is ok, when I try to decrease, I don’t have enough stitches. I have three sc on the top of 3tr, sc in the next two stitches, I have only one stitch before two sc stitches and top where I do 3 sc. I only have 5 stitches between top of mountain. Did I do wrong on the previous row??? Could you please help me????
LikeLike
I’m sorry this is causing you trouble! From the way you describe it you are doing row 32 correctly — you should have 5 sts between the increases at the top of the mountains, like you have. I’m not sure why you’re ending up short on stitches. If you email me pictures maybe I can help more effectively! My e-mail is hannahdavis1988 (at) gmail (dot) com
LikeLike
Hello Hanna – I have finally started on your beautiful blanket after “pinning” the pattern from Pinterest quite some time ago – even have ordered the wonderful Stylecraft yarn. I’m now trying to do the Chevron/Ripple rows and have run into the same problem that the lady above ran into. Sorry to report that a your Row 32 is not correct. Where you state to “pull up 3 loops, yo and finish the stitch” it should read 1 sc, as decreasing 3 sts in Row 31 and Row 32 is decreasing 6 its between the two rows. Prior to this, I ripped out its, reread your instructions over and over – even read thru all the above comments to see if anyone else found this to be a problem. So I have done my own thing in Row 32 by sc 7 between the 3 sc at the top of the tri3 and finally come out the the 192 that I’m supposed to have. But thank you – I’m learning other new stitches and love that challenge.
Sharon from Wisconsin
LikeLike
Wow! This is an amazing tutorial!!! I’ve been trying to find one like this!! Thank you so much!!!
LikeLike
I’m really glad you like it. I hope you have fun making it!
LikeLike
J’ai démarré ce plaid et j’aime beaucoup, merci pour ce tuto. Plus de détails sur mon blog si vous le souhaitez.
LikeLike
Beautiful…!
I have just found out I will be getting a granddaughter in March….after having 8 grandsons.. and this is my new project for her arrival. I can’t wait to start using my ‘pinks..creams & lilacs” for her blanket. I will upload a pic of my granddaughter & her new bkanket in March! 😃
LikeLike
Congratulations!!! Can’t wait to see your beautiful blanket with your beautiful granddaughter! 🙂
LikeLike
I’m making this beautiful blanket as we speak! I’m on row 32, right in the middle of the Chevron. I’ve had a few issues, but with the help of enlarging the photos here and YouTube, I think I’ve finally gotten the hang of it. I’m not a very experienced at crocheting.
Your letter caught my eye because my blanket is also going to my first granddaughter! I know your joy because I also had only boy grandchildren til my Lily came along April 2016! I’m over the moon about her!
Have fun making the blanket and best wishes for a beautiful future with you little granddaughter! ❤
LikeLike
Found this pattern on Pinterest and have started my blanket – at row 32- loving all the different stitches though my bobbles didn’t turn out real puffy- any suggestions? Also would love to see the other blankets people have done but am not seeing the link that was talked about on down load pattern? Could you direct me to it? THanks!
LikeLike
My bobbles weren’t very puffy either. If you want them puffier you can try adding another stitch to it or changing it to a popcorn stitch. As far as the page you mentioned, I ended up taking it down because there were so many photos sent to me I couldn’t keep up. However if you check out the pattern page on Ravelry you can see a bunch of them! Hope that helps!
LikeLike
Heya! Thanks so much for this pattern – used it to make a huge blanket for my mum for Christmas! It’s at the bottom of this post: http://seafogg.co.uk/2016-craft-review Thanks again for such a fab pattern! 🙂
http://www.seafogg.co.uk
LikeLike
Haven’t started yet, but your directions, photos, and diagrams are outstanding. Thanks.
LikeLike
I’m considering doing this as a tempetrue blanket and am wondering how long your finished blanket was with the 131 rows and the 3 border rows? It’s hard to find something interesting that isn’t ginormous with 365 rows.
LikeLike
I’d say it’s around 4 feet now that it’s stretched out a bit. If you go down a hook size I think you would be ok.
LikeLike
Hi saw your comment on the ‘as we go stripey’ crochet afghan. I was wondering if you ever did the temperature blanket? If so how long did it end up?
LikeLike
OK I know this is old BUT I still want to thank you for the pattern and pics. I have been wanting to make a blankie but my attention span is nonexistent. This is perfect for me! Dif colors and stitches the whole way through! Woo hoo! Just ordered the yarn, I’m going big. All still available btw. Thanks again, so sweet of you. Also the pics are awesome. I’m kinda newish so I’m sure I shall need some of them. ☺ Thanks!
LikeLike
I’m glad you like it and I hope you enjoy making it! 🙂
LikeLike
I have a problem with row 27 (Bobble row).
9 hdc and 1 bobble give exactly 10 stitches.
How can you end up with 7?
At 193, only 3 remain.
Need urgent help. Maybe I misunderstood.
Sorry for my bad English.
LikeLike
With the bobble rows I feel it’s less important that you end up with the right number of stitches than it is to try and get the bobbles evenly spaced and do every bobble row the same. If you’re coming up with a weird number of stitches left over it’s OK, just make sure you have the same number of stitches that you started the blanket with. 🙂
LikeLike
Pretty! O so pretty!
LikeLike
ROW !2 PROBLEM – I love this blanket! When I started it, I couldn’t stop because I couldn’t wait for the next row. I had no problems with rows 1-8. I have gotten to a standstill though because I’m having problems with row 12. I cannot get my stitches close together. I have spaces in places in between stitches which make the row look terrible. I did previous row 11 with a sized up hook so that the row would not curl up tight as instructed. I am going to have to pull out previous row(s) to try and fix this I guess. I hope I can.
LikeLike
I had so much trouble with row 12 as well. I somehow just played around with it and did my own thing trying to get eight stitches in each Group. Are the directions correct in row 12 I think I’m probably just reading it wrong.
LikeLike
Thank you so much for the pattern; I have just about started and have completed 12 rows… praying that I complete this beautiful project
LikeLike
I’m loving this pattern, but am confused by the ripple row. The written instructions say to put the HDC, DC and TC in separate stitches, but the picture looks like the DCs and TR are in the same stitch? Either way doesn’t leave me with enough stitches for 2 SC in between the increases and decreases! Help!
LikeLike
There are supposed to be 3 tr sts in the same stitch, but the dcs & hdcs are supposed to be in separate stitches. I know it’s kind of hard to tell in the photos because the red is so bright and kind of obscures details. Hope that helps!
LikeLike
I also had trouble with the ripple stitch – row 31 did not work out number wise for me which threw off the number of stitches in row 32 and 33. I just did whatever worked out to get the pattern looking OK but in the end row 31 does not look good at all.
I tried it again in row 71 – 47 and really had the wrong number of stitches in #72.
I really followed the pattern as written – I THINK! but had trouble in both ripple secions
LikeLike
I’m sorry you had trouble with those sections. If you haven’t done a border or anything you can rip them out and skip them because the numbers in the rows before and after should match up.
LikeLike
Hi Hanna I am enjoying do this. I have learned so many new stitches. Im on row 35 & I ended up with an extra 5 stitches. hould I rip out that row & skip 5 stitches along the way thanks for any help
LikeLike
You could try that! If you have removable stitch markers after you rip the row out you could mark every 10 stitches in the row below to make sure everything’s OK before you redo the row. Sorry you’re having trouble though. Let me know if it continues to be a problem and we’ll figure something out!
LikeLike
I do not mind if the rows are messed up – it makes it not perfect – home made and every stitches done with love – so a few – or many – errors are ok with me. I am sure the errors are just the way I am reading the pattern as I am fairly new at this . I love this blanket – I am on row 160 I will send a picture when it is done. Thanks for this!
LikeLike
I also have wonky rows but I think it gives it character. New at this as well.
LikeLike
I have just finished this blanket after more than a year of picking up and putting down – I would love to share a photo with you – but can’t find the right place to do so. Thank you for the pattern – it was very straight forward and fun. Danielle
LikeLike
I’d love to see! Just e-mail me at davish14 (AT) winthrop (DOT) edu
LikeLike
Hello. I just finished my blanket. It is huge and im pretty sure the sides are uneven but I dont care lol. I used neon colors and instead of weaving in my ends I tied them off. So its like having tassels on the sides. I just love it. Its actually the second blanket I have ever finished. I have not been crocheting long and cannot read a pattern to save my life but with this I can. I printed out the pages with the pictures and put them in page protectors kind of like a book. I loved this blanket so much Im going to start another one but in pastel colors. And it will be for my kids (who have already tried to stake claim on this blanket) so it wont have to be so big. Thank you for posting this pattern!!
LikeLike
I’m so glad you liked it! And I hope you enjoy making the second one just as much. 🙂
LikeLike
I love the finished blanket and your pattern, photos, and directions are the best I’ve ever seen!! I’m making this soon!!
LikeLike
Thank you! I hope you have fun making it! 🙂
LikeLike
I love your pattern, just had a problem with the Catherine wheels I didn’t like how they were lop-sided so I increased to 9 stitches.
LikeLike
First, thank you so much for this beautiful pattern! Second, a question. I began the blanket with the same number of stitches as you, but after finishing the first rows of the granny stitch, I count less stitches than what I started with. Is this supposed to happen? If not, what would you suggest to fix it? Thanks 🙂
LikeLike
I’m frustrated and can’t figure out what’s wrong. I’m on my first bobble row 27. I then DC across row 28 and wound up with more than I started with by 34 stitches. Exactly the number of bobbles in the row. I have 9 stitches between each bobble except on the ends where theres 8. I started with 313 stitches.
Help! I’m stuck. Should it be 8 stitches between bobbles?
Signed,
Bente
LikeLike
Hannah…
Just to let you know I’ve worked out the problem! I’m loving this!
Thank you so much for this! It’ll be a treasured heirloom!
Bente
LikeLike
Fantastic pattern, it was a joy to make, thank you.
LikeLike
I love this pattern! I work on it when I become bored with my other 10 blanket wips. But they are Christmas gifts and I have to finish. I started with 20 rows from a you tube video, I didn’t really want to have to just repeat the 20 different, rows over and over, so I found your pattern. Luckily for me it has the same multiples. I think after I finish my wips I’m going strictly for these types of blankets. You don’t get bored when its constantly changing! Thank you so much for the pattern!
LikeLike
I’m actually doing 2 of these, 1 in cotton and 1 in acrylic. More or less stash busting.
LikeLike
Thanks for these amazingly detailed instructions!! I just finished the first lot of star stitch. Now I’m 4 stitches short in the following DC row. Not sure where I lost them but I don’t really want to go back!🤔 Maybe I can make them up in the next row of DC or the granny stripe rows..any suggestions welcomed!! 😬
LikeLike
I adore this blanket! I’m hoping, this won’t be the last of its kind from you? I’m only about half way through it, but I love this type of sampler blanket. Your instructions and pictures are the best I’ve seen. So easy to follow. You should consider doing a CAL on Facebook with a new As We Go Again Stripey Blanket! Release it in sections per week. That would be so wonderful! Thank you for this pattern though. I already have plans to make another one in different colors❤
LikeLike
How long was it at 131 rows?
LikeLike
A beautiful blanket with the clearest instructions I have ever seen. Thankyou so much.
LikeLike
Do you have this on utube?
LikeLike
We were going away for a break, my partner asked me to download the pattern for this stripey blanket. I did this (lots of pages and lots of ink used in the process). She is a very competent crochet knitter and began to do it as soon as we left in the train. She did the first row, it looked very nice then she became completely stuck and frustrated because all directions were in American English and were impossible to understand for her, so she is left with a lot of wool and a very short unfinished stripey blanket. I feel it should be pointed out on the web-site that this may not be understood by British crochet knitters.
LikeLike
I’m sorry this happened! It actually is on the website that I use American English but I guess that’s something I need to add to the actual PDFs as well. Thanks for pointing this out!
LikeLike
When working the HDC and the DC rows… should the last stitch be worked into the chain from the previous row?
LikeLike
When working the HDC and DC rows… should the last stitch be worked into the top of the chain from the previous rows?
LikeLike
Hannah,
This is the most beautiful blanket I have ever seen. I only knew how to do sc and dc, but I wanted to try. It is so hard to find tutorials that fully make sense, so I figured I would get frustrated as always and quit half way through, ripping it apart. That isn’t happening and it’s turning out beautifully. You have an amazing talent for teaching! I have been going through each new stitch slowly and studying the pictures and for the first time, I’m making something incredible. I can’t believe I’m doing this and am proud of what I’m accomplishing and it’s all thanks to you. I actually look like a true crocheter! I’m using 18 different colors, just because I couldn’t decide, so I’m using them all. I will post a picture when I’m done. Thank you! Thank you! Thank you! Cindy Meyer
LikeLike
Cindy, I’m so glad you’re enjoying the pattern so much! It was my goal to make it as clear and detailed as possible so it’s great to hear that the pattern is easy to understand. I can’t wait to see the photos!
LikeLike
This is an amazing instruction! All my gratitude that you share this for free!
What a work you must had, taking all the pictures. And it ’s great: I am from Begium, speaking dutch, and a chrochet dummie.
LikeLike
Merci infiniment pour ton patron. Avec photos et très bonnes instructions cela fait de vraies merveilles.
Karen
LikeLike
I am about to attempt this – so much leftover wool – I’ve never seen such a marvelous tutorial. 🙂
LikeLike
Just finished this blanket and it was sooo much fun to do that I’m ready to do another! Thinking about using baby yarn and doing a baby blanket!
LikeLike
Thank you, I’m glad you enjoyed it! 🙂
LikeLike
So excited to do it
Thank you ❤️
LikeLike
What size do you rcoomend for a baby blanket and how would I modify it? How many stitches would I start with? I would want it crib size not stroller size. Thanks!
LikeLike
I’m sorry I’m so late in replying! If you’re still looking to do this, you’ll need to chain a multiple of 24. Depending on your tension I would guess that chaining 72 or 96 would be good.
LikeLike
Sorry that should read recommend
LikeLike
Thank you so much for your beautiful tutorial. I have a WIP & refer back all the time. Well done to keeping a crochet enthusiast like me hooking 👌🌸
LikeLike
This is a great tutorial. Thank you so much for all your hard work and time. I hunted for days and days on the internet to finally find the perfect pattern/tutorial. Can’t wait to get started.
LikeLike
Thank you! I hope you’re enjoying it!
LikeLike
I love all the detailed photos. My niece is trying to teach herself to crochet and I’d love to help her (I’ve been crocheting for nearly 50 years) but she lives too far away. I think your photos & instructions will be almost as good as having Auntie at her side.
I think I’ll give this pattern a try myself, but I’ll probably turn it into a winter scarf so it won’t take me forever to finish.
LikeLike
That’s wonderful! I hope it was helpful for her — I tried to make it easy for beginners — and I also hope you enjoyed/are enjoying making it in a scarf version!
LikeLike
Lovely blanket and great tutorial. This has inspired me to have a go. When I’ve completed the other 276 projects I have on the go😃
LikeLike
Thank you so much! Hehe, I completely understand that! 🙂
LikeLike
I don’t comment on Blog posts, like ever. BUT your tutorial was amazing and i had to post!! I am so excited to pick out some colors and get to work on a king sized blanket for my bedroom. THANK YOU THANK YOU!!
LikeLike
Thank you so much for leaving such a kind comment, I really appreciate it and I’m glad that you like the blanket! I bet a king sized one will be gorgeous! 🙂
LikeLike